

Your plastic bag is a coffin for your crust. You spent thirty-six hours nursing a starter and perfecting your stretch-and-folds just to hear that iconic bread crackle. It's pure magic. But by tomorrow morning, that shatter-crisp masterpiece often feels like a damp sponge. It's a heartbreaking waste of effort that every dedicated baker understands. You deserve better than rubbery bread.
We're here to fix that. This 2026 guide reveals the exact science of preventing sourdough crust from getting soft so you can maintain that perfect crunch for three full days. You've done the hard work of baking. Now, it's time to master the art of preservation. Your craft deserves respect even after it leaves the oven.
We will explore why your cooling process is likely failing you and how to stop moisture from suffocating your loaf. You'll learn why the refrigerator is your bread's worst enemy and how a breathable beeswax barrier outperforms paper every time. From the critical six-hour cooling rule to professional storage secrets, we're going to ensure your last slice is just as satisfying as the first. Let's keep that crust alive.
Key Takeaways
- Master the science of moisture migration. Understand how water moves from the soft crumb to the exterior and learn how to manage this process effectively.
- Respect the cooling phase. Discover why waiting at least two hours before slicing is a non-negotiable step for protecting your bread's signature shatter-crisp texture.
- Stop using plastic bags that suffocate your loaf. We compare the best storage mediums for preventing sourdough crust from getting soft while keeping the interior tender.
- Revive a tired loaf with a splash of water and a quick oven reset. These professional techniques can bring back the crunch even after the crust has lost its edge.
- Upgrade your kitchen toolkit with the Everloaf Orvix bag. This organic cotton and beeswax solution is specifically designed to respect the needs of your artisan bread.
Why Sourdough Crust Gets Soft: The Science of Moisture Migration
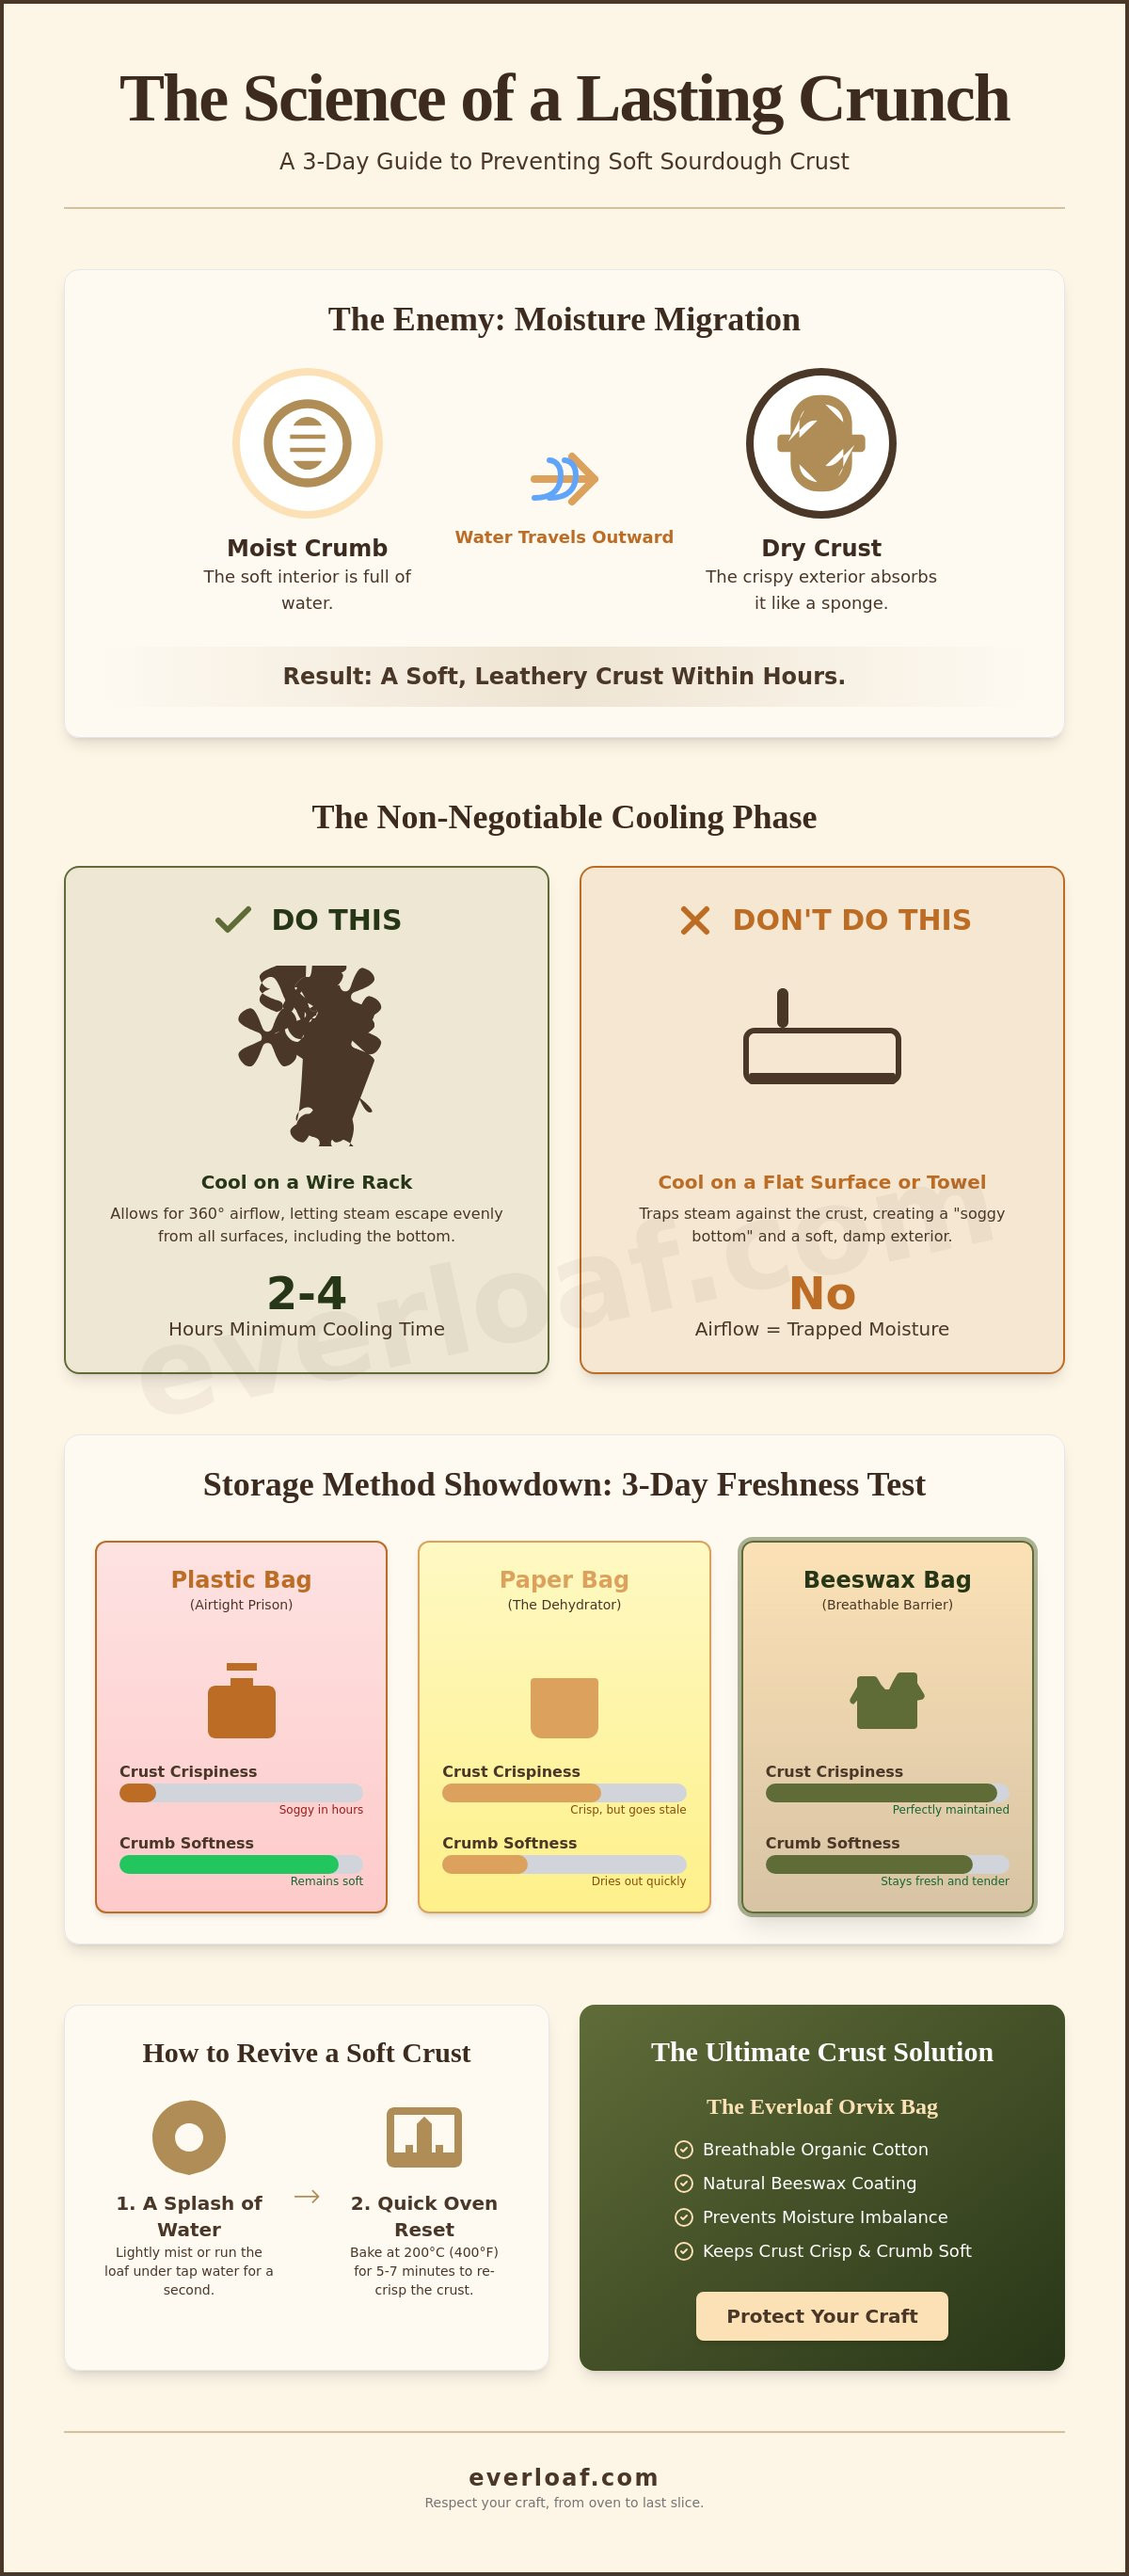
Your bread is alive with movement even after it leaves the oven. The primary reason for that disappointing, rubbery texture is a process called moisture migration. It is a simple but destructive scientific reality. Water naturally moves from the moist, hydrated crumb to the dry, crispy crust. This constant internal shift is the main obstacle in preventing sourdough crust from getting soft.
The crust itself is hygroscopic. It acts like a thirsty sponge. It doesn't just pull water from the inside of the loaf; it also draws moisture from the air in your kitchen. During sourdough fermentation, complex sugars and acids form the exterior structure. These elements are highly attractive to water molecules. Without the right storage strategy, your crust will eventually reach a state of 'crust equilibrium' where it's just as damp as the air around it.
The Difference Between Softening and Staling
Many bakers confuse softening with staling. They are not the same thing. Softening is a moisture management issue. Staling, or starch retrogradation, is a chemical process where starch molecules crystallize and make the bread feel hard or dry. Staling happens faster in cold environments, which is why we never recommend the refrigerator.
Plastic bags are famous for preventing staling because they trap every ounce of moisture inside. However, this is exactly why they are the ultimate crust killer. They create a high-humidity prison for your loaf. The trapped water vapor settles on the surface, turning your shatter-crisp exterior into a rubbery, leathery layer within hours. If you are serious about preventing sourdough crust from getting soft, you must avoid airtight plastic at all costs.
How Ambient Humidity Ruins Your Crunch
Your kitchen's environment plays a massive role in the life of your loaf. High-humidity kitchens are the natural enemy of sourdough. If you live in a damp climate or bake on a rainy day, the ambient moisture in the air will attack your crust from the outside in. Seasonal weather changes can drastically alter how long your bread stays crisp before the environment wins.
Moisture migration is the primary cause of leathery crust. To fight it, you need a storage medium that allows for breathability without total dehydration. This is why solutions like the Everloaf beeswax bread bag are so effective. They provide a semi-permeable barrier. They let just enough moisture escape to protect the crust while keeping the crumb soft. Don't let your hard work dissolve into a soggy mess. Your bread deserves a better home.
Cooling Your Loaf: The 2-Hour Rule for Lasting Crunch
Patience is the final, most difficult ingredient in any bake. That golden loaf smells incredible. The aroma fills your kitchen and tempts you to grab a knife immediately. Resist the urge. Cutting into hot bread is the fastest way to destroy thirty-six hours of careful work. It forces the steam to exit through the cut surface rather than the crust, resulting in a gummy interior and a soggy exterior. If you are serious about preventing sourdough crust from getting soft, you must respect the cooling phase.
Your bread is still cooking after it leaves the oven. This is the evaporation phase. During this time, residual heat continues to set the internal starches while moisture slowly migrates toward the surface. If this moisture is trapped against a flat surface, you create "bottom-sog." This happens when steam collects at the base of the loaf, turning a perfectly browned bottom into a damp mess. We recommend a strict 2-hour minimum cooling protocol before you even think about a slice. For the best results, letting the loaf rest for four hours is even better.
The Necessity of the Wire Cooling Rack
Airflow is your best friend. A wire cooling rack provides 360-degree ventilation, allowing moisture to escape from every angle. Never let your bread cool on a solid countertop or a wooden cutting board. Some bakers wrap their loaves in kitchen towels to keep them "clean," but this often traps too much moisture against the crust. If you want a truly professional finish, try the "oven cooling" trick. Turn off the oven, crack the door open, and let the loaf sit on the rack inside for ten minutes. This extra blast of dry, receding heat helps set the crust before it hits the room-temperature air. Once it is fully cooled, moving it into a breathable beeswax bread bag will maintain that hard-earned texture.
Testing for Internal Stability
How do you know when the wait is over? Use a digital thermometer. The internal temperature should drop below 100°F (38°C) before you break the seal. According to scientific research on bread storage, the stabilization of the crumb structure is directly tied to this temperature drop. If the center is still warm, the starches haven't fully crystallized. A loaf that feels light and sounds hollow when tapped on the bottom is a good sign, but the thermometer never lies. Wait for the cold. Your patience will be rewarded with a shatter-crisp crust that lasts for days instead of hours.
The Best Storage Methods: Comparing Plastic, Paper, and Beeswax
Plastic is a disaster for artisan bread. It creates a high-humidity environment that ruins the science of moisture migration we discussed earlier. Within hours, the crust absorbs every bit of trapped water vapor. This is the primary hurdle in preventing sourdough crust from getting soft. You end up with a leathery exterior that requires a toaster to save. It's a tragedy for a loaf that took two days to create. If you use plastic, you are essentially steaming your bread after it has already left the oven.
Paper bags offer the opposite problem. They are far too breathable. While they keep the crust crisp for the first few hours, they allow the interior moisture to escape far too quickly. By the next morning, your beautiful sourdough has the texture of dry cardboard. This "cardboard effect" happens when the crumb loses its hydration before the crust can even settle. You need a solution that balances these extremes. You need a storage medium that acts as a smart filter rather than a total seal.
Why Beeswax is the Superior Choice for Sourdough
Beeswax bread bags provide the perfect equilibrium. The foundation is organic cotton, which offers natural breathability that synthetic fibers simply can't match. The beeswax coating adds a semi-permeable layer. It allows just enough moisture to escape so the crust stays firm while keeping enough inside to protect the soft crumb. It's the most effective tool for beeswax bread bags for homemade bread because it respects the bread's biology. Your crust stays shatter-crisp for up to three days. Your crumb stays moist and tender. It's the best of both worlds for serious bakers.
The Bread Box Myth
Don't trust every bread box you see. Many modern versions are purely decorative and lack proper ventilation. If a bread box is airtight, it acts exactly like a plastic bag. It traps moisture and invites mold to grow in the dark, damp corners. If you use a box, ensure it has small air holes or a loose-fitting lid. For the ultimate protection, wrap your loaf in a breathable beeswax wrap before placing it inside. This double-layer approach gives you the highest chance of maintaining that perfect crunch. It creates a micro-climate that is ideal for preventing sourdough crust from getting soft while guarding against environmental humidity.
How to Restore a Soft Crust: Quick Revitalization Techniques
Even with the best intentions, humidity can be a thief. You might wake up to find your once-shattering crust has turned slightly leathery. Don't panic. Your bread isn't ruined. It just needs a quick reset. While we focus on preventing sourdough crust from getting soft through proper storage, knowing how to reverse the process is a vital skill for any home baker. You can bring that bakery-fresh crunch back in under ten minutes. Your loaf deserves a second chance at greatness.
The secret is heat and a surprising touch of moisture. If your loaf feels soft, a quick trip back to the oven will draw out the excess water that migrated to the surface. For a loaf that is starting to feel stale as well as soft, use the "water splash" trick. Run the entire loaf quickly under a cold tap or mist it heavily with a spray bottle. It sounds counterintuitive. Trust the process. The water creates a thin layer of steam in the oven that crisps the exterior while the heat refreshes the interior crumb.
The 350-Degree Refresh
Preheat your oven to 350°F (177°C). Place your whole loaf directly on the center rack without a baking sheet. Bake it for five to ten minutes. This short blast of dry heat forces moisture to evaporate from the crust, restoring its structural integrity. Never use a microwave for this. Microwaves vibrate water molecules, which creates a tough, rubbery texture that is nearly impossible to chew. Use the oven. It respects the craft. Once you hear that signature crackle again, let it cool for a few minutes before you reach for your knife.
Proper Slicing for Longevity
How you cut your bread matters just as much as how you store it. Stop cutting from the ends. Instead, slice from the center of the loaf. When you are finished, push the two remaining halves back together. This protects the exposed crumb from the air and keeps the interior moist while the crust stays dry. Using the best knife for cutting sourdough bread is essential here. A dull blade will compress the crust and squeeze out precious moisture. A professional serrated edge glides through without damaging the microscopic structure you worked so hard to build.
Store your halves cut-side down on a wooden board or inside a breathable container. This simple habit, combined with a high-quality storage solution, is the gold standard for preventing sourdough crust from getting soft over multiple days. If you want to stop the softening before it starts, invest in a beeswax bread bag to maintain that perfect, professional balance of airflow and protection.
The Everloaf Orvix Bag: The Ultimate Solution for Crust Integrity
The Orvix bag is the final word in crust protection. We designed it with a deep respect for the baker's journey. It combines 100% organic cotton with a coating of pure, food-grade beeswax. This isn't just a bag. It's a specialized environment that masters the delicate balance between moisture retention and breathability. It is the most effective tool for preventing sourdough crust from getting soft that we have ever developed. Plastic suffocates your craft. Paper dehydrates it. The Orvix bag breathes with it.
We offer a 10-day freshness promise for your sourdough. This sounds bold, but the science of the semi-permeable barrier supports it. By allowing excess moisture to escape while shielding the crumb from the air, we extend the life of your loaf far beyond traditional methods. It is a sustainable, plastic-free solution for the eco-conscious baker who refuses to compromise on quality. You put thirty-six hours into your dough. Give it the home it deserves. Secure your Everloaf beeswax bread bag today and experience the difference for yourself.
Crafted for Artisan Standards!
Our design finds its roots in the rich culinary heritage of Lyon, France. This city understands the value of a perfect loaf. We chose 100% organic materials because your food safety is non-negotiable. Synthetic coatings and "cheap" alternatives often use industrial chemicals that can leach into your crust. Our community of bakers refuses to settle for less. One dedicated user recently shared that their crust stayed "bakery-fresh and shatter-crisp for three full days" without any reheating. That is the standard we aim for with every bag we ship.
Maintenance for Lifetime Use!
This is the last bread bag you will ever need to buy. Maintaining the wax coating is incredibly simple and takes less than a minute. Just rinse the bag with cool water and a drop of mild, alcohol-free soap. Let it air dry naturally away from direct heat sources. Never use hot water, as it will melt the protective wax and ruin the seal. Over time, the bag develops a beautiful patina that tells the story of your bakes. For a deeper dive into the technical side of preservation, read our guide on how humidity affects bread storage. Understanding your environment is the first step toward preventing sourdough crust from getting soft forever.
Protect Your Craft and Savor Every Shatter-Crisp Slice
You mastered the stretch and fold. You conquered the oven spring. Don't let a plastic bag or a humid kitchen steal your hard work. Preventing sourdough crust from getting soft is about more than just cooling. It is about giving your loaf a home that breathes. By following the two-hour cooling rule and respecting the science of moisture migration, you ensure every slice is a masterpiece. Your skill deserves respect.
Our Orvix bag provides the specialized care your bread needs. We hand-infuse every bag with 100% pure beeswax. Culinary professionals from Lyon designed this solution to keep bread fresh for up to 10 days. It respects the crust's integrity while protecting the tender crumb. Stop settling for rubbery textures. Stop wasting your ingredients. You've earned a better experience.
Keep your crust crispy with the Orvix Beeswax Bread Bag. Join a community of bakers who refuse to compromise on quality. Your next loaf is waiting for the protection it deserves. Keep baking with passion.
Frequently Asked Questions
Why does my sourdough crust get soft so quickly after baking?
Moisture migration is the culprit. Water naturally moves from the hydrated crumb to the dry exterior. If your kitchen is humid, the crust also absorbs water from the air. This process is the biggest hurdle in preventing sourdough crust from getting soft. Proper cooling on a wire rack for at least two hours is your first line of defense against this inevitable shift.
Can I store my sourdough in the fridge to keep it crispy?
Never put your artisan bread in the refrigerator. Cold temperatures accelerate starch retrogradation, which is the scientific term for staling. Your bread will go stale up to six times faster in the fridge than at room temperature. It won't stay crispy; it will just become hard, dry, and flavorless. Stick to a breathable room-temperature environment for the best results.
Are paper bags better than plastic for sourdough crust?
Paper is better than plastic, but it is not perfect. Plastic traps all moisture and turns your crust into a soggy sponge almost instantly. Paper bags allow the crust to breathe, but they often breathe too much. This leads to the "cardboard effect" where your bread becomes rock-hard within twenty-four hours. A beeswax bag offers the middle ground you need for long-term freshness.
How long should I wait before putting my sourdough in a bag?
Wait at least two to four hours until the loaf is completely cool to the touch. If the center is even slightly warm, it will release residual steam inside the bag. This trapped vapor is a death sentence for a crispy crust. Use a digital thermometer to ensure the internal temperature has dropped below 100°F (38°C) before you consider storage.
Will a beeswax bag make my bread taste like wax?
High-quality beeswax bags do not transfer flavor to your bread. We use pure, food-grade beeswax that is completely inert. It creates a protective barrier that respects the complex flavor profile of your sourdough. You will taste the fermentation and the grain, not the storage medium. Thousands of bakers in our community trust this method to keep their loaves pristine.
What is the best way to reheat sourdough to get the crunch back?
Use the "Oven Reset" method at 350°F (177°C) for five to ten minutes. This dry heat forces surface moisture to evaporate and restores the crust's structural integrity. Avoid the microwave at all costs. Microwaves vibrate water molecules and create a tough, rubbery texture. A quick oven refresh is the only way to honor the craft and get that professional crackle back.
Does the hydration level of my dough affect how soft the crust gets?
Higher hydration doughs contain more water, which means there is more moisture available to migrate to the crust. If you bake a 80% hydration loaf, you must be even more diligent about preventing sourdough crust from getting soft. These loaves require a full four-hour cooling period. They also benefit significantly from the semi-permeable protection of a beeswax wrap during storage.
Is it better to store sourdough sliced or as a whole loaf?
Always store your bread as a whole loaf whenever possible. Slicing increases the surface area exposed to the air, which speeds up both softening and staling. If you must slice it, cut from the center outward. Push the two remaining halves together before placing them in your bread bag. This simple trick protects the interior crumb while keeping the crust dry and firm.


