

Your parchment paper is sabotaging your sourdough's potential. Every time you struggle with folded edges or singed knuckles, you risk deflating hours of hard work. Learning how to use a bread sling for sourdough is the single most important upgrade you can make to your baking ritual in 2026. It is the essential interface between a delicate proof and a professional, crackling crust.
We all know the high-stakes tension of dropping a cold boule into a 500°F Dutch oven. One slip often leads to a lopsided loaf or a painful burn. You deserve a process that respects the craft you put into your dough. Since 71% of consumers say texture is the key to food enjoyment, your crust deserves better than paper creases and sticking.
This guide ensures you master the art of safe, professional transfers while preserving that perfect bottom crust. We will walk through the seamless loading process, temperature safety, and how the Everloaf Bread Sling creates a sustainable, reusable path to the perfect bake.
Key Takeaways
- Upgrade your safety and precision. Replace fragile parchment with a tool that handles 500°F heat and protects your hands from scorching Dutch oven walls.
- Master the perfect transfer. Learn exactly how to use a bread sling for sourdough to move delicate dough from basket to pot without losing its shape.
- Protect your crust's integrity. Discover the simple adjustments that prevent burnt bottoms and ensure a professional, even bake across the entire loaf.
- Extend your bread's life. Use the sling to improve airflow during cooling before transitioning your masterpiece to a beeswax Bread Bag for maximum freshness.
What is a Bread Sling and Why Sourdough Bakers Need One
Your sourdough boule is a living masterpiece. It deserves better than a haphazard drop into a scorching pot. A bread sling is the professional baker's secret to consistency. It is a specialized, heat-resistant mat designed to act as a bridge between your proofing basket and your Dutch oven. Unlike disposable options, this tool is built for the long haul. It features a flexible, non-stick surface and elongated handles that make the transition effortless.
The engineering behind a quality tool like the Everloaf Bread Sling is precise. These slings are crafted from food-grade silicone reinforced with a fiberglass core. This combination ensures the mat remains stable under extreme temperatures without leaching. It provides a flat, reliable base that supports even the wettest, high-hydration doughs. When you learn how to use a bread sling for sourdough, you stop fighting your equipment. You start focusing on your craft. It is a deliberate shift toward a more professional, zero-waste kitchen.
The Problem with Traditional Parchment Paper
Many bakers start their journey with Parchment paper. It is a classic choice, but it has clear limits. Standard paper often becomes brittle at the 475°F or 500°F temperatures required for a bold sourdough bake. It chars; it tears. Worst of all, the stiff edges of the paper often fold inward during the bake. This creates permanent, unsightly creases in the side of your otherwise beautiful crust. Over time, the cost of single-use sheets adds up. Investing in a reusable sling is a one-time decision that pays for itself in both quality and sustainability.
Safety Benefits for High-Heat Baking
Safety is a necessity when working with cast iron. A Dutch oven preheated to 500°F is a constant hazard. Traditional methods require you to drop dough from a height or reach dangerously close to glowing metal walls. Mastering how to use a bread sling for sourdough removes this anxiety entirely. The long handles allow you to lower your boule with surgical precision. You protect your knuckles from accidental contact with the pot. There is no more "drop and pray" method. You gain total control over the placement, ensuring an even bake every single time.
Step-by-Step: How to Use a Bread Sling for Sourdough
Preheat your oven and Dutch oven together. Aim for a blistering 450°F to 500°F. Keep your silicone sling on the counter during this stage. It does not need to be preheated; its primary job is to stay cool enough to handle while you prepare the dough. This thermal separation is exactly why learning how to use a bread sling for sourdough improves your workflow. You gain a calm, controlled environment for the final preparation steps.
Flipping Your Dough Safely
Precision starts at the flip. Place your bread sling directly over the mouth of your proofing basket. Center the circular base carefully. Place one hand on the back of the sling and the other under the basket; then invert the whole assembly in one swift, confident motion. Lift the basket slowly to reveal the taut skin of your dough. It should be perfectly centered and ready for the oven. This method is a significant upgrade from the traditional parchment paper sling, which can often slip or shift during the flip. A silicone base grips the counter, providing a foundation that paper simply cannot match.
Scoring on a Stable Surface
Many bakers make the mistake of scoring their dough after it is already inside the hot pot. This is dangerous and limits your creativity. The flat, stable surface of the sling allows you to score with confidence. Use a sharp best knife for cutting sourdough bread to create deep, clean expansion cuts. You can even execute intricate wheat stalks or leaf patterns without the handles interfering. The dough sits at a comfortable height, giving you the leverage needed for a perfect "ear" during the bake.
Once scored, grab the long handles. Lower the dough gently into the center of your preheated Dutch oven. The handles should rest against the sides of the pot. Place the lid on top immediately to trap the steam. Bake for 20 to 25 minutes with the lid on, then remove the lid to finish the crust. Because silicone is an effective insulator, it protects the bottom of your loaf from the direct, intense heat of the cast iron. This ensures your bread develops a golden, crackling exterior rather than a charred base. When the bake is finished, lift the handles to remove your loaf instantly. Once it cools, you can tuck your masterpiece into a beeswax bread bag to keep that hard-earned texture fresh for days.
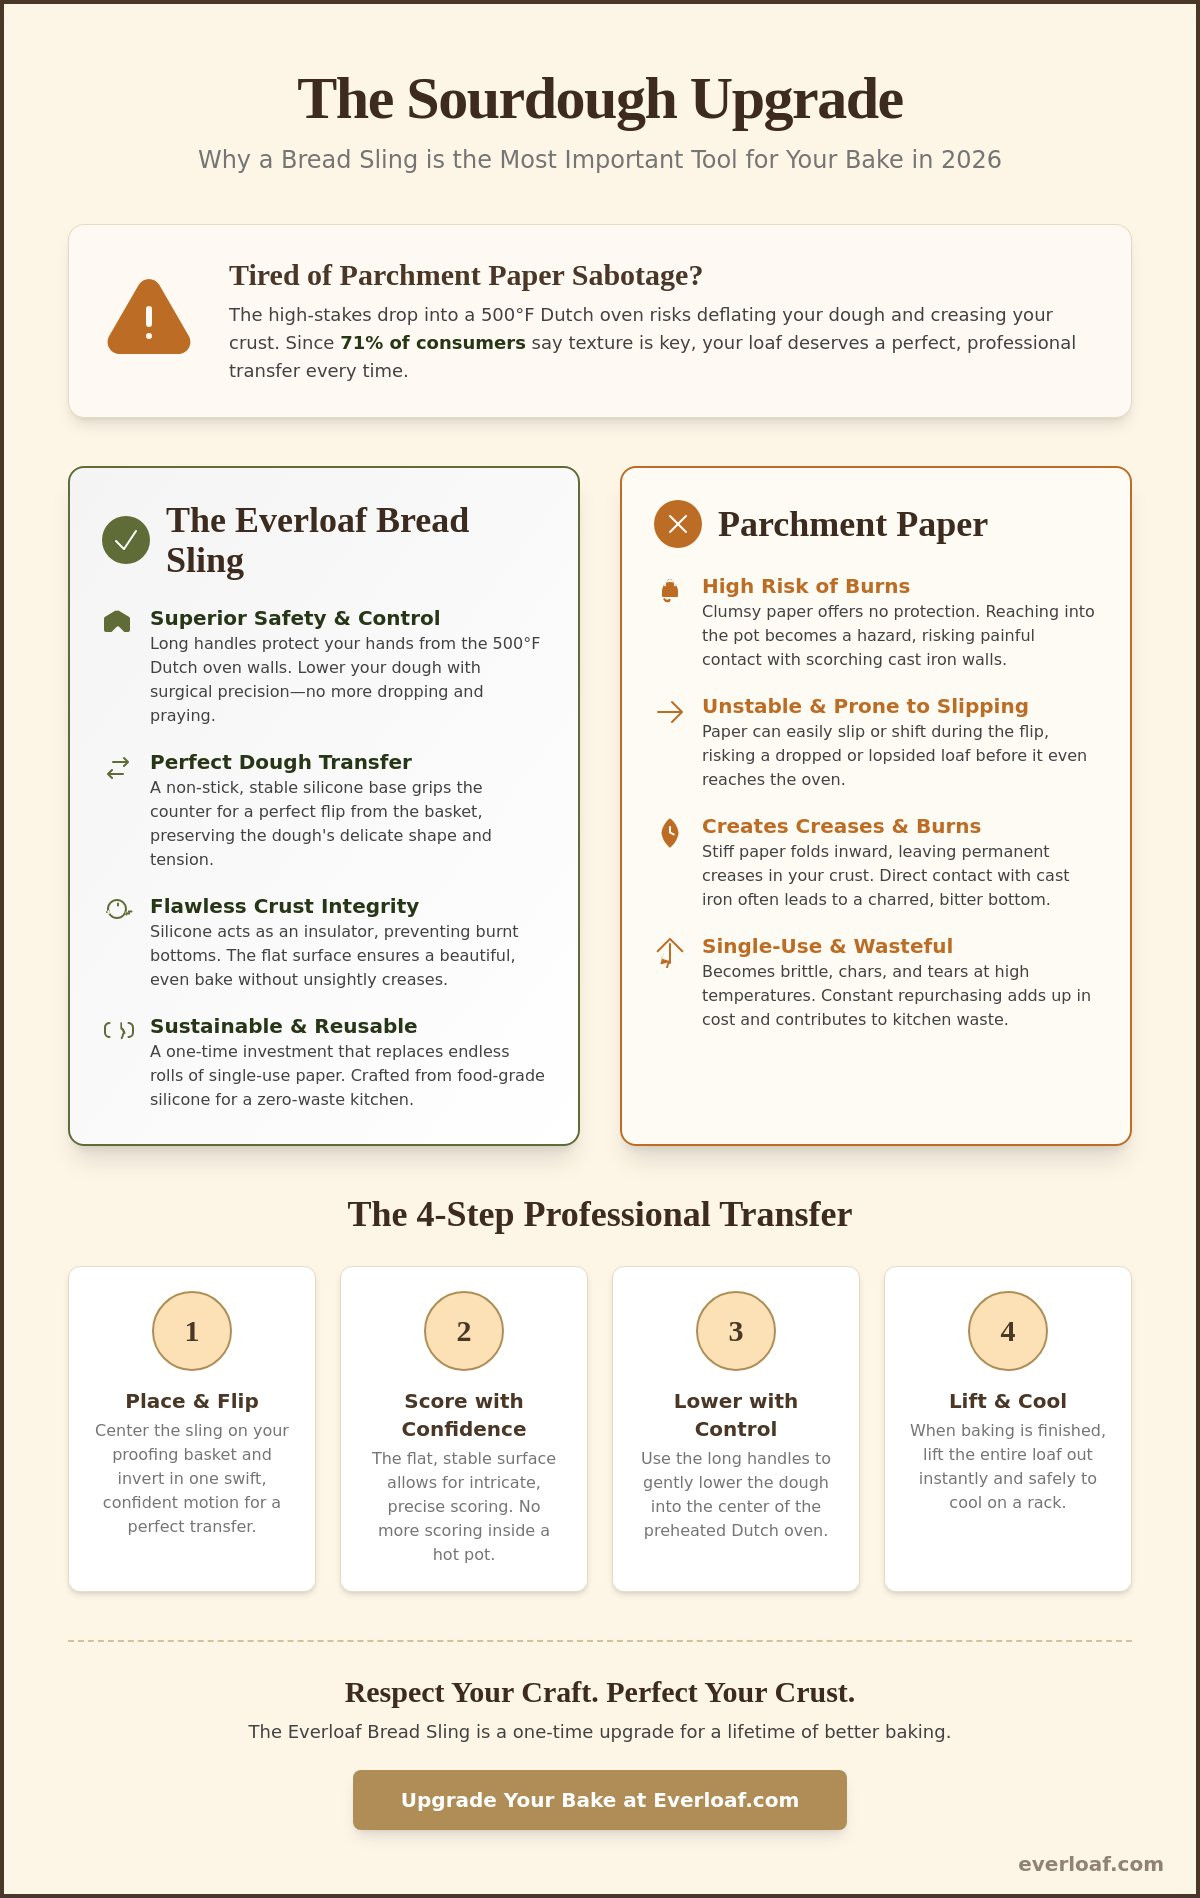
Bread Sling vs. Parchment Paper: The Ultimate Comparison
Parchment paper is a temporary fix. It is an amateur’s crutch that often fails under the pressure of professional-grade heat. Most standard parchment is only rated for 425°F or 450°F. Sourdough requires more. When you push your oven to the 500°F limit, paper becomes brittle, chars, and often sticks to the base of your loaf. A silicone sling handles these extreme temperatures with ease. It remains flexible and non-stick at 500°F, ensuring your bread releases perfectly every time.
The difference in bottom crust texture is undeniable. Paper is thin. It offers zero insulation against the aggressive heat of cast iron. This often results in a scorched, bitter bottom that ruins a perfect Sourdough Bread. A silicone sling acts as a thermal buffer. It moderates the heat transfer, allowing the bottom to crisp up without burning. You get a golden, crackling finish instead of a blackened base.
The environmental cost of parchment paper is also a factor. It is a single-use product often coated in non-recyclable materials. Every loaf you bake creates more landfill waste. A reusable sling eliminates this cycle entirely. It is a cleaner, more ethical way to bake. Beyond the ethics, there is the sheer convenience. You never have to worry about running out of paper mid-bake. Your sling is always ready, waiting in your drawer for the next boule.
Moisture and the Bottom Crust
Silicone excels where paper fails, especially with high-hydration doughs. It prevents the "burnt bottom" syndrome by providing a stable, insulated barrier. If you enjoy baking with inclusions like cheese or fruit, you know the struggle of sugar sticking to paper. Silicone is naturally non-stick. Your loaf will slide right off without leaving half the crust behind. This reliability is why serious bakers are transitioning to natural eco friendly bread storage and preparation tools. It is about respecting the ingredients and the process from start to finish.
Durability and Value
Consider the long-term investment. A single roll of parchment paper might last a month. A high-quality silicone sling, like the Everloaf Bread Sling, is rated for 3000+ bakes. It is a tool built to last a lifetime. Cleaning is effortless. A quick rinse with warm water and soap is all it takes. For storage, you can lay it flat in a drawer or roll it up. Rolling helps maintain its structural integrity without creating permanent kinks. The Everloaf approach is simple. We believe in tools that eliminate waste and elevate your results. When you know how to use a bread sling for sourdough, you stop buying disposables and start building a legacy of better baking.
Troubleshooting: Perfecting the Sling Method
Even the best tools require a fine touch. If you have mastered how to use a bread sling for sourdough but still face a dark bottom crust, your oven's heating element might be too aggressive. This is common in residential ovens where the bottom element stays on to maintain heat. You can solve this by placing a heavy baking sheet on the rack directly below your Dutch oven. This simple shield deflects the direct infrared heat. It allows the silicone to moderate the temperature perfectly.
Handle management is another key to success. Ensure the long handles of your Everloaf Bread Sling are pulled taut against the inner walls of the pot before you drop the lid. If the handles bunch up near the rim, they can prevent the lid from sealing. This lets precious steam escape. A tight seal is non-negotiable for that signature sourdough spring. If you see steam leaking during the first 20 minutes, check your handle placement immediately.
Choose the right shape for your vessel. Verified facts from 2026 show that silicone slings are widely available in both oval and round configurations. A 5-quart round pot needs a round sling to prevent the silicone from folding. Excess material creates the very creases you are trying to avoid. Matching the tool to the pot ensures the dough stays supported and the heat distributes evenly across the base.
The Air Gap Trick for Better Crust
Beyond the baking sheet, some bakers add a light dusting of cornmeal or rice flour under the sling base. This creates a tiny, protective air gap that further insulates the dough. Once your loaf is out and cooling, the work isn't done. Transitioning your bread to reusable bread bags for homemade bread ensures that perfect crust stays crackling instead of becoming chewy. Proper storage is the final step in the professional process.
Cleaning and Maintenance
Silicone is incredibly resilient. While most are dishwasher safe, hand-washing with warm, soapy water is the best way to preserve the non-stick surface long-term. Scrub away any carbonized bits or flour dust immediately after the sling cools. Inspect your tool regularly. If you see deep cuts from a sharp blade or if the fiberglass core becomes exposed, it is time for a fresh Everloaf. Treat your equipment with reverence. It will reward you with thousands of perfect bakes.
Protect your hard work by storing your next loaf in a beeswax bread bag to maintain that bakery-quality freshness.
From Sling to Storage: Preserving Your Sourdough
Your loaf has just emerged, golden and crackling. The hard part is over. Now, the preservation begins. Understanding how to use a bread sling for sourdough extends beyond the oven door. It is the first step in a cooling process that respects the crust you just perfected. You have invested hours into this dough. Do not fail it in the final moments.
When you lift the Everloaf Bread Sling from the Dutch oven, place it directly onto a wire cooling rack. Resist the urge to slide the bread off immediately. The sling provides a stable, aerated base that prevents the "sweaty bottom" often caused by trapped steam on solid surfaces. Air circulates freely. Moisture escapes evenly. This patience ensures the crumb sets perfectly without the crust becoming soggy. It is a seamless transition from extreme heat to stable rest.
Once the loaf is completely cool to the touch, usually after two to four hours, it is time to move it. A professional baker never treats storage as an afterthought. It is the final chapter of the bake. Your sourdough is a living product. It needs an environment that balances moisture retention with breathability. This is where your choice of storage determines whether your bread lasts a day or a week.
Don't Waste Your Effort on Plastic
Plastic is a death sentence for a great crust. It suffocates the bread. It traps every ounce of evaporating moisture, turning your crackling sourdough into a soft, rubbery sponge within hours. This "crust softening" is the most common mistake home bakers make. You worked hard for that ear; do not let a synthetic bag dissolve it. A cotton bread bag is the sling's natural partner. It allows just enough air exchange to keep the interior soft while protecting the exterior's crunch.
The 10-Day Freshness Solution
For those who bake high-hydration loaves, moisture management is even more critical. Our storage philosophy centers on longevity and respect for the craft. The Orvix Beeswax Bag is engineered for this exact purpose. The beeswax coating mimics the protective qualities of the silicone sling, providing a semi-permeable barrier. It keeps the bread from drying out without the suffocating effects of plastic. It is the ultimate way to honor your process. Stop settling for stale bread and start treating your loaves with the reverence they deserve. Keep your sourdough fresh with the Everloaf Beeswax Bread Bag.
Elevate Your Baking Ritual
Mastering how to use a bread sling for sourdough is more than a simple safety upgrade. It is a commitment to the quality of your craft. You've moved beyond the limitations of charred parchment paper. You've embraced precision, safety, and a superior bottom crust. Your boules are now consistent, professional, and free from unsightly paper creases. This is the high standard your bread deserves.
Don't let that hard-earned crackling texture fade the moment it leaves the cooling rack. Your bread has inherent needs that plastic simply cannot meet. Our Orvix Beeswax Bread Bag was designed by leading culinary experts to act as the perfect companion to your bake. Using 100% Organic Cotton and Pure Beeswax, it maintains the ideal moisture balance. It keeps your sourdough fresh for up to 10 days without sacrificing that signature crunch.
The journey from the proofing basket to the dinner table should be seamless and rewarding. You have the tools. You have the technique. Now, give your masterpiece the home it deserves. Protect Your Perfect Crust with the Orvix Beeswax Bread Bag. Keep baking with passion and pride.
Frequently Asked Questions
Can I leave the bread sling in the oven during the entire bake?
Yes, you can leave the sling in the Dutch oven for the entire baking process. It is designed to endure sustained high heat without melting or releasing fumes. This continuous contact allows the sling to act as a thermal buffer, protecting the dough from the intense, direct heat of the cast iron. You don't need to remove it when you take the lid off for the final browning stage.
Does a silicone bread sling affect the bottom of the sourdough crust?
A silicone sling improves the bottom crust by preventing it from scorching. Unlike thin parchment, the silicone provides a layer of insulation that moderates heat transfer. This results in a golden, crispy base rather than a blackened or bitter one. Learning how to use a bread sling for sourdough ensures your crust remains thin and crackling across the entire surface of the loaf.
What temperature is safe for a silicone bread sling?
Most high-quality silicone bread slings are oven safe up to 500°F. This covers the standard range for sourdough baking, which typically occurs between 450°F and 485°F. Always check the specific rating of your tool to ensure it meets these professional standards. Using a sling within its rated temperature prevents material degradation and ensures the longevity of your investment for thousands of bakes.
How do I clean my sourdough bread sling?
Clean your sling with warm, soapy water after every use to remove flour dust and carbonized residue. Most are dishwasher safe, but hand washing often preserves the non-stick surface for a longer period. Avoid using abrasive sponges or metal scrapers that could damage the silicone coating. A quick rinse and a thorough dry before rolling it for storage will keep the tool in pristine condition.
Will a bread sling fit any size Dutch oven?
Bread slings are designed to fit most standard 5 to 7 quart Dutch ovens. However, you should match the shape of the sling to your pot for the best results. A round sling works best in a circular pot, while an oval sling is necessary for oblong vessels. Ensuring the base of the sling lies flat against the bottom of the pot prevents the dough from shifting or baking lopsided.
Can I use a bread sling for other types of bread besides sourdough?
You can use a bread sling for any loaf baked in a Dutch oven or on a baking stone. Whether you are making a no-knead yeast bread or a dense rye, the sling provides the same safety and transfer benefits. It is a versatile tool that simplifies the handling of any heavy or delicate dough. If the recipe requires high heat and a covered vessel, a sling will improve your process.
Is a silicone sling better than parchment paper for high-hydration dough?
A silicone sling is far superior for high-hydration doughs because it is naturally non-stick and won't tear when wet. Sticky dough often fuses to parchment paper, leading to a messy release that ruins your crust. When you know how to use a bread sling for sourdough, the loaf slides off effortlessly. It remains stable and supportive, even when the dough is extremely soft and difficult to handle.
How do I prevent my sourdough from getting soft after baking?
Prevent a soft crust by cooling your bread completely on a wire rack before storing it. Trapped steam is the primary cause of a rubbery exterior. Once cool, avoid plastic bags at all costs. Instead, use a breathable barrier like our beeswax Bread Bag. This allows for minimal air exchange, keeping the interior soft while preserving the hard-earned crunch of your sourdough crust for up to 10 days.


