

What if your dull blade is actually an insult to your twelve-hour sourdough ferment? It's heartbreaking to watch a beautiful, airy loaf collapse under the weight of a blunt knife. You spent days perfecting that crumb, yet a neglected tool is mangling the result. Most bakers fear the maintenance process, worried they'll permanently file away the serrations that make their blade special. We believe your tools deserve better. Learning how to sharpen a bread knife is not just a chore; it's a precision ritual that honors your hard work in the kitchen.
With nearly 62% of home cooks now sharpening their own tools at least every three months, it's time to join the community of makers who refuse to settle for subpar equipment. We promise to help you master the specialized technique of using a sharpening rod to restore that essential mechanical bite. This guide provides a complete checklist for tooth-by-tooth maintenance to ensure every slice is effortless. You'll gain the confidence to treat your Sourdough Knife with the reverence it earned, ensuring it glides through hard crusts without ever crushing the crumb again.
Key Takeaways
- Identify the warning signs of a failing edge using the "Crust Test" to save your sourdough from being crushed and torn.
- Understand why a tapered ceramic rod provides the necessary precision to maintain individual serrations without the risks of electric sharpeners.
- Follow our professional checklist on how to sharpen a bread knife to restore its original factory bite safely at home.
- Protect your investment by identifying "knife killer" cutting boards that dull your blade faster than the hardest artisan crusts.
- Master the tooth-by-tooth technique to ensure your Sourdough Knife glides through every loaf with effortless results.
The Bread Knife Diagnostic: Is Your Blade Truly Dull?
A dull bread knife is a silent thief. It steals the airy texture from your crumb and turns a crispy crust into a mangled mess. Instead of a clean, decisive slice, a blunt blade "tears" through the bread. It compresses the interior. It turns your beautiful fermentation work into a dense, gummy block. Understanding the health of your blade is the first step in learning how to sharpen a bread knife correctly.
While many cooks rely on the "Tomato Test" for their chef's knives, serrated edges require a different approach. A tomato test checks for a fine, razor edge. However, the "Crust Test" measures mechanical bite. If your blade slides across a hard sourdough boule without catching, the points are rounded. Sourdough crusts are the ultimate stress test for serrated steel. The caramelized sugars of a long bake act like sandpaper on the metal. If you don't respect the edge, the bread won't respect the knife.
Before you dive into the technical side of knife sharpening, look for visual cues. Hold your blade under a bright light. Do the tips of the serrations look rounded? Do you see "shining" metal along the scallop edges? These reflections indicate that the steel has folded or worn down. A healthy blade looks dark and sharp at the edge. It doesn't reflect light back at you from the very tip.
The 3-Point Dullness Checklist
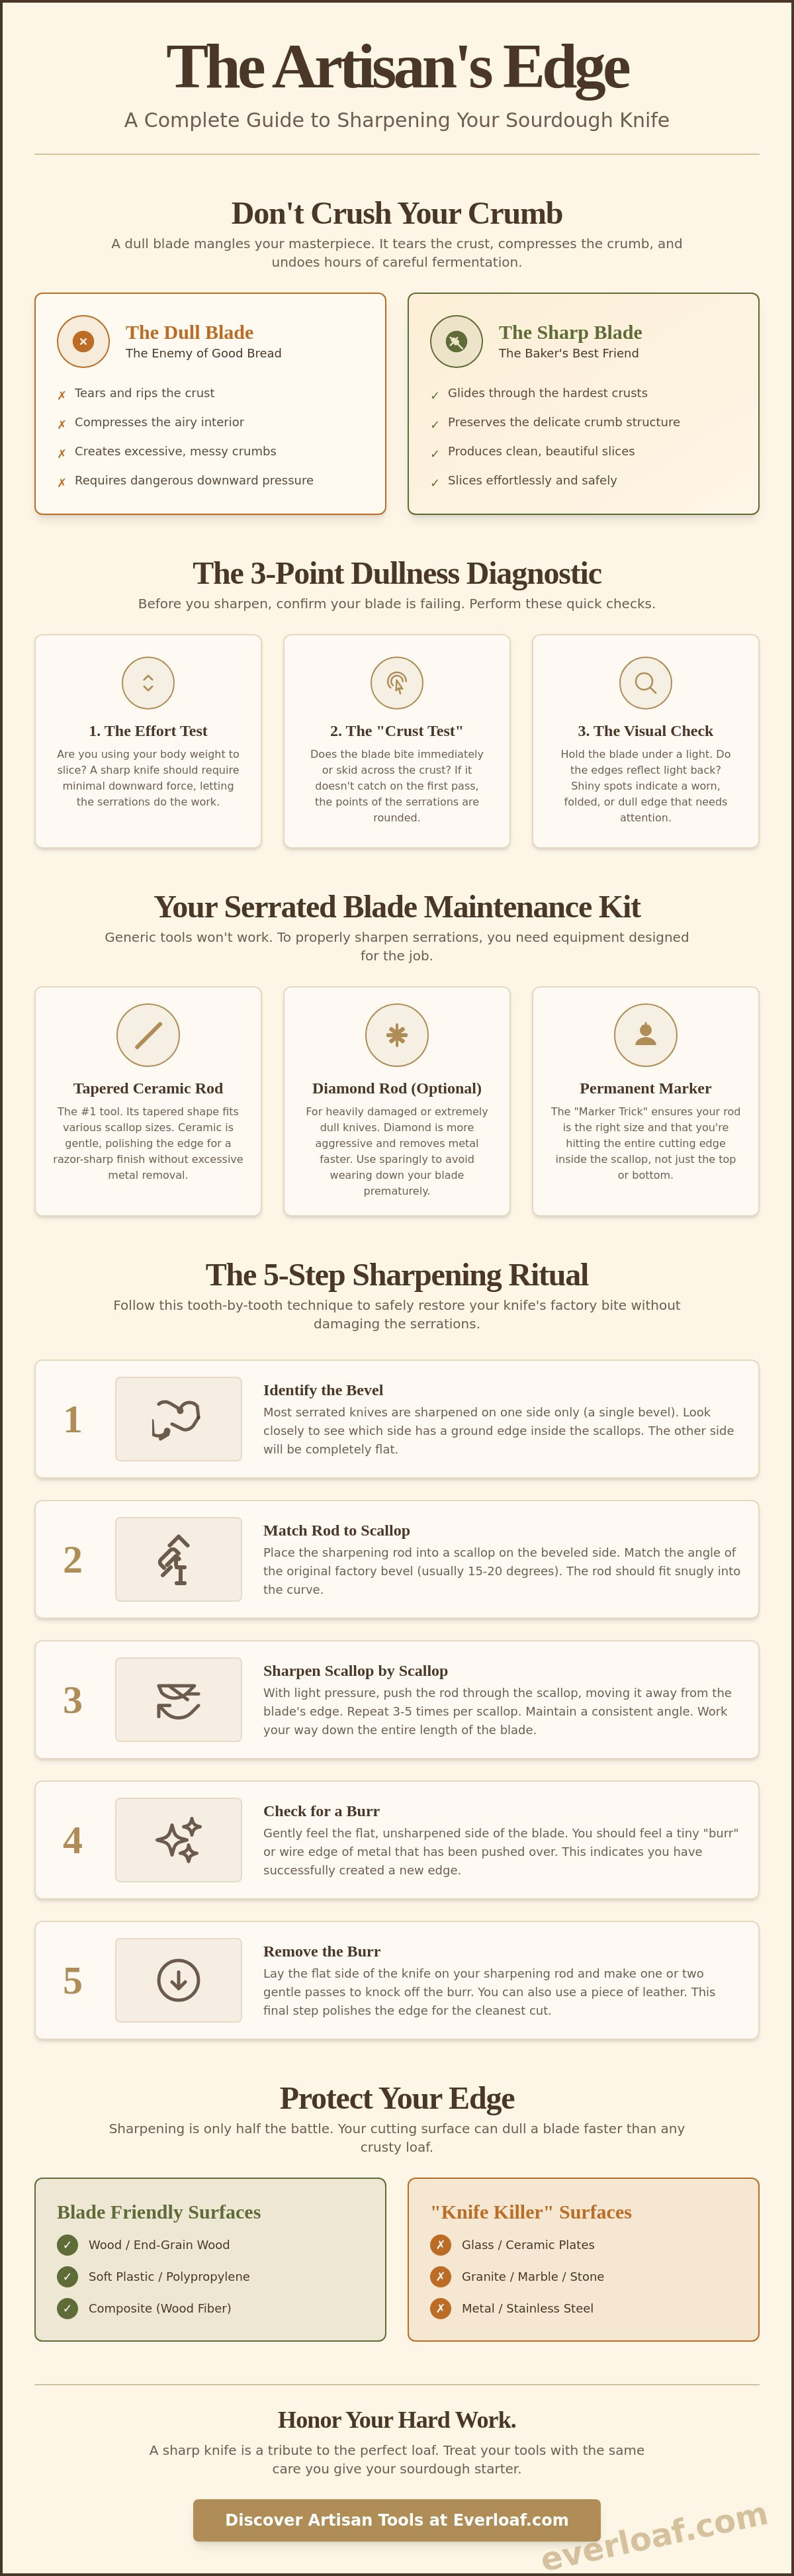
Is your knife actually failing? Use this quick diagnostic. First, notice the physical effort. You shouldn't have to lean your body weight into the loaf. Second, watch the entry. The knife should bite the crust immediately. If it slips or skids, the points are gone. Finally, examine the slice. Look for "pilling" or little balls of torn dough. If the crumb isn't smooth, your blade is definitely dull.
Blade Anatomy: Points vs. Valleys
Your bread knife is a series of tiny saws. The points do the heavy lifting. They pierce the hard crust. They take the most damage from the cutting board. Because of this, the points dull much faster than the valleys. The valleys often remain factory-sharp even when the knife feels useless. Most artisan tools, like The Sourdough Knife, feature a single-sided bevel. This asymmetrical geometry is intentional. It allows the blade to track straight through a thick loaf without wandering. Knowing how to sharpen a bread knife means respecting this specific geometry without grinding it away.
The Essential Tool Checklist for Serrated Blade Maintenance
Your sourdough deserves a surgical edge. You can't achieve that with generic tools. Stop using flat whetstones for this specific task. They are perfect for chef's knives but useless for serrations. They only hit the tips and ruin the geometry of the scallops. To understand how to sharpen a serrated knife, you must embrace the rod. Learning how to sharpen a bread knife requires a tool that can reach into the valleys of the blade.
The tapered ceramic rod is your best friend. It accommodates the varying scallop sizes found on most high-quality artisan blades. Diamond steels are a faster alternative. They remove metal aggressively and efficiently. Use them only if your blade is severely chipped or completely rounded. For routine maintenance, ceramic is king. It's gentler on the steel. It polishes the edge while it sharpens, extending the life of your professional tools.
Clean your blade before you begin. Dried sourdough starches are incredibly abrasive. They clog your sharpening tools and reduce their effectiveness. Use warm, soapy water and a soft brush to remove every trace of flour and resin. Never sharpen a dirty knife. It's like trying to sand fine wood with mud on the surface. Once your blade is pristine, you can focus on restoring that bite. After you've finished the maintenance, keep your hard work protected in a beeswax bread bag to maintain the perfect crust-to-crumb ratio.
Choosing the Right Rod Diameter
Precision matters here. You need a rod that seats fully into the "valley" of the tooth. If the rod is too thick, it only touches the points and ignores the cutting edge. Try the "Marker Trick." Color the inside of a serration with a permanent marker. Run your rod through once. If the ink is gone, your diameter is perfect. If ink remains at the bottom, your rod is too large.
Safety and Stability Gear
Don't skip the safety prep. Serrated edges are unpredictable when they slip. Use a non-slip bench pad to anchor your work. Beginners should wear cut-resistant gloves. It builds confidence while you learn how to sharpen a bread knife without fear of injury. Finally, have a leather strop ready. A quick pass on leather removes the "burr" or tiny metal flap created during sharpening. This final polish ensures the blade glides rather than snags.
Comparing Sharpening Methods: Rods vs. Electric vs. Pro Services
Precision is a choice. When you decide how to sharpen a bread knife, you are choosing the future lifespan of your tool. Manual tapered rods remain the gold standard for enthusiasts who value control. These tools allow you to feel the steel. You can adjust your pressure for every individual scallop. This meticulous approach ensures you never remove more metal than necessary. It's the difference between a tailored suit and one off the rack. Manual sharpeners account for 35% of the market revenue for a reason. They respect the craft.
Electric sharpeners offer undeniable speed. They account for about 48% of unit shipments in 2026 because they promise convenience. However, speed often comes with a hidden cost. Many electric units use high-speed abrasive wheels that grind down the overall height of your serration points. This mechanical error eventually turns your specialized blade into a wavy, ineffective strip of metal. If you must use one, ensure it has a dedicated "serrated-safe" slot. These slots are designed to touch only the beveled side, though they still lack the finesse of a human hand.
Sometimes, a blade is too far gone for home maintenance. If your serrations are chipped or completely flattened, professional services are the answer. As of May 2026, professional sharpening for a standard bread knife typically costs between $10 and $20. These masters can reprofile a damaged edge that would take hours to fix manually. For those on a strict budget, the "Sandpaper Hack" is a reliable community favorite. Simply wrap a piece of 600-grit sandpaper around a thin wooden dowel. It mimics the profile of a tapered rod and provides a surprisingly effective edge for just a few cents.
The Risks of Pull-Through Sharpeners
Avoid generic pull-through devices at all costs. These tools are designed for straight-edged chef's knives. When you pull a serrated blade through these V-shaped slots, you are effectively "shaving" off the teeth. They only hit the very tips of the points. They leave the valleys completely dull. This creates a jagged, uneven edge that will tear your bread rather than slice it. It's a quick way to ruin a high-quality tool permanently.
Cost-Benefit Analysis for Home Bakers
Investing in a quality ceramic rod, which typically ranges from $10 to $105, is a one-time expense that saves you money long-term. Compare this to the cost of replacing your Sourdough Knife because of poor maintenance. A standard 20-tooth sharpening session takes about ten minutes. This small time commitment ensures your blade survives for decades. Learning how to sharpen a bread knife manually isn't just about saving money. It's about the emotional satisfaction of maintaining the tools that feed your family.
Step-by-Step: Sharpening Your Bread Knife Without Ruining the Teeth
Your knife is a specialist. It deserves a specialist's touch. Mastering how to sharpen a bread knife is a meditative process that requires patience and precision. You aren't just grinding metal; you are restoring the mechanical soul of your tool. Follow these steps to ensure your blade returns to its peak performance without compromising its unique geometry.
- Step 1: Clean the blade. Use warm water and a soft cloth. Remove every microscopic trace of dried sourdough starch. These resins act as a barrier between the steel and your sharpening tool.
- Step 2: Identify the beveled side. Most artisan bread knives are ground on only one side. Look closely at the blade. One side is flat; the other has angled "scallops." You only sharpen the side with the scallops.
- Step 3: Find the angle. Position your tapered rod into the first scallop. Match the factory angle, which is typically between 15 and 20 degrees. If the rod sits flush against the steel, you've found the sweet spot.
- Step 4: Execute the stroke. Use short, controlled movements. Always move the rod away from the cutting edge. This prevents the tool from catching and damaging the delicate points.
- Step 5: Complete the ritual. Repeat this process for every single tooth across the entire length of the blade. Don't rush. Every scallop matters.
Mastering the Stroke Technique
Consistency is more important than speed. Apply light, even pressure. When learning how to sharpen a bread knife, remember that less is more. Heavy pressure can deform the thin steel of the serrations. Count your strokes. Perform exactly five strokes per scallop to ensure even metal removal across the blade. Be careful near the tips. If you roll the rod over the points, you'll blunt the very part of the knife meant to pierce the crust. Once your blade is restored, keep your bread at its peak by storing it in a beeswax bread bag.
Deburring the Flat Side
Most guides ignore the most critical step: the burr. As you sharpen the beveled side, a tiny curl of metal, a burr, develops on the flat back of the blade. If you leave it there, the knife will snag and tear the crumb. Feel for it gently with your thumb, moving away from the edge. To remove it, lay the flat side of the blade against the side of your rod or a flat whetstone. Use a single, gentle wiping motion. This snaps the burr off, leaving a clean, razor-sharp finish. Verify your work with the "Paper Slice Test." A perfectly sharpened serrated knife should slice through a piece of printer paper without a single snag.
Beyond the Blade: Protecting Your Edge for Better Slices
Your sharpening ritual is only half the battle. If you master how to sharpen a bread knife but ignore your cutting surface, you are wasting your time. Glass and marble cutting boards are "knife killers." These materials are harder than the steel of your blade. Every slice against a glass surface acts like a hammer blow to your delicate serrations. Stick to edge-grain wood or high-quality composite boards. They offer the "give" your knife needs to stay sharp through hundreds of loaves.
There is a direct connection between crust hardness and blade wear. A loaf that has been left to air-dry becomes a rock. Slicing through a dehydrated, petrified crust is a recipe for a dull edge. Proper storage keeps your bread in the "Goldilocks" zone. It maintains a crust that is crispy enough to crackle but soft enough to yield to a well-maintained blade. Heavy bakers should establish a routine. Don't wait for the "Crust Test" to fail. Hone your blade once a month to keep the bite aggressive and the effort minimal.
Storage Solutions for Knife Longevity
Stop throwing your tools into crowded drawers. Contact with other metal utensils chips the points of your serrations. Magnetic strips are the superior choice. They keep the edge isolated and dry. Humidity also plays a secret role in tool health. Storing your sourdough in a Beeswax Cotton Bread Bag prevents the "rock-hard" crust that dulls blades prematurely. By managing the bread's environment, you are indirectly managing the lifespan of your knife. For those without wall space, a dedicated blade guard is a mandatory investment for any high-quality serrated tool.
The Baker’s Daily Care Checklist
Respect the steel every single day. Never put your bread knife in the dishwasher. The high heat and aggressive detergents cause microscopic corrosion on the serrations. This weakens the metal before you even start slicing. Hand-wash your blade with mild soap. Dry it immediately with a soft towel. Standing water is the enemy of a fine edge. If you want to dive deeper into preserving your hard work, check out our guide on Bread Loaf Bags. It's the perfect way to complement your slicing technique and ensure your tools and your loaves stay in peak condition. Knowing how to sharpen a bread knife is essential, but knowing how to treat it daily is what makes a master baker.
Master the Art of the Perfect Slice
A blunt blade is no longer an obstacle between you and your perfect sourdough. You now have the checklist to diagnose dullness, the tools to fix it, and the step-by-step technique to restore every serration. Mastering how to sharpen a bread knife ensures your artisan loaves keep their airy structure and crackling finish. Respect your tools. They are the bridge between your hard work and the final, satisfying bite.
If your current knife is beyond saving or lacks the mechanical bite you need, it's time for an upgrade. Upgrade your slicing game with our professional Sourdough Knife. We designed it specifically for thick artisan crusts using high-carbon stainless steel for elite edge retention. The ergonomic handle provides the precision sawing power required for even the most stubborn crusts. Every tool in your kitchen should work as hard as you do.
Take pride in your maintenance ritual. Your kitchen is a workshop, and your tools are a reflection of your dedication. Keep your edges sharp and your loaves beautiful. You've earned every perfect slice.
Frequently Asked Questions
Can I use a regular knife sharpener for a bread knife?
No. Most regular sharpeners will destroy your serrations. They are built for straight-edged blades. Pulling a serrated knife through a V-shaped slot flattens the teeth and ruins the factory geometry. You need a tool that respects the individual valleys of the blade. Stick to a tapered ceramic rod to ensure you maintain the knife's unique cutting power.
How often should I sharpen my sourdough bread knife?
Heavy bakers should hone their edge once a month. If you bake occasionally, every three to six months is sufficient. Use the "Crust Test" to check for skidding. If the blade slides on a sourdough boule, it's time to learn how to sharpen a bread knife again. Regular maintenance prevents the need for aggressive metal removal later.
Why are bread knives only sharpened on one side?
This is a single-bevel design. It allows the knife to track straight through a thick loaf without wandering. It also simplifies the maintenance process for the baker. You only need to sharpen the scalloped side to restore the edge. The flat side stays untouched except for a quick deburring pass to remove metal curls.
What is the best tool for sharpening a serrated knife at home?
A tapered ceramic rod is the gold standard for home use. Its shape allows it to fit into various scallop widths. This ensures you sharpen the entire "valley" of the tooth rather than just the tips. High-end rods provide a professional finish without the mechanical risks of an electric sharpener.
Can I sharpen a bread knife with a whetstone?
You cannot use a flat whetstone on the serrated face. It will only hit the points and ruin the profile of the teeth. However, a whetstone is perfect for the flat back of the blade. Use it to gently wipe away the burr after you've finished with your tapered rod. This ensures a clean, snag-free slice.
How do I know if my bread knife is beyond repair?
Your knife is beyond repair if the serrations have been ground completely flat. If the "teeth" are gone, the tool can no longer grip the crust. Deep cracks in the steel or a severely bent blade are also signs it's time to retire the tool. Respect the tool enough to know when its service has ended.
Is it better to sharpen or just buy a new bread knife?
Sharpening is always the best choice for high-quality steel. It respects the craft and extends the life of your investment. However, if you're using a budget blade with poor edge retention, upgrading is better. A high-carbon stainless steel blade like The Sourdough Knife will stay sharp much longer than a cheap alternative.
Does cutting hot bread dull the knife faster?
Cutting hot bread is a common mistake that affects performance. The steam and gummy interior of a hot loaf create high friction. This causes the blade to "drag" and feel duller than it actually is. Let your loaf cool completely to preserve the crumb. Learning how to sharpen a bread knife won't help if you're mangling hot dough.


