

Why are you treating your handcrafted sourdough like a common sandwich loaf? It is painful to watch a premium artisan crust turn into a rock-hard brick because of poor storage. You have made the switch to sustainable living, yet you might still worry about bacterial growth or ruining your investment with the wrong cleaning method. Knowing how to care for beeswax bread wraps is the vital difference between a wasted loaf and a full week of perfect morning toast.
We believe your bread deserves a breathable home that respects the baker's craft. You do not have to fear the cold water rules or guess when it is time for a refresh. This 2026 guide helps you master the simple art of maintaining a perfect microclimate for your sourdough. We will show you the exact routine to keep your artisan bread fresh for up to 10 days and ensure your wraps last for a full year. Your bread works hard to be delicious; it is time to give it the specialized attention it needs to stay that way.
Key Takeaways
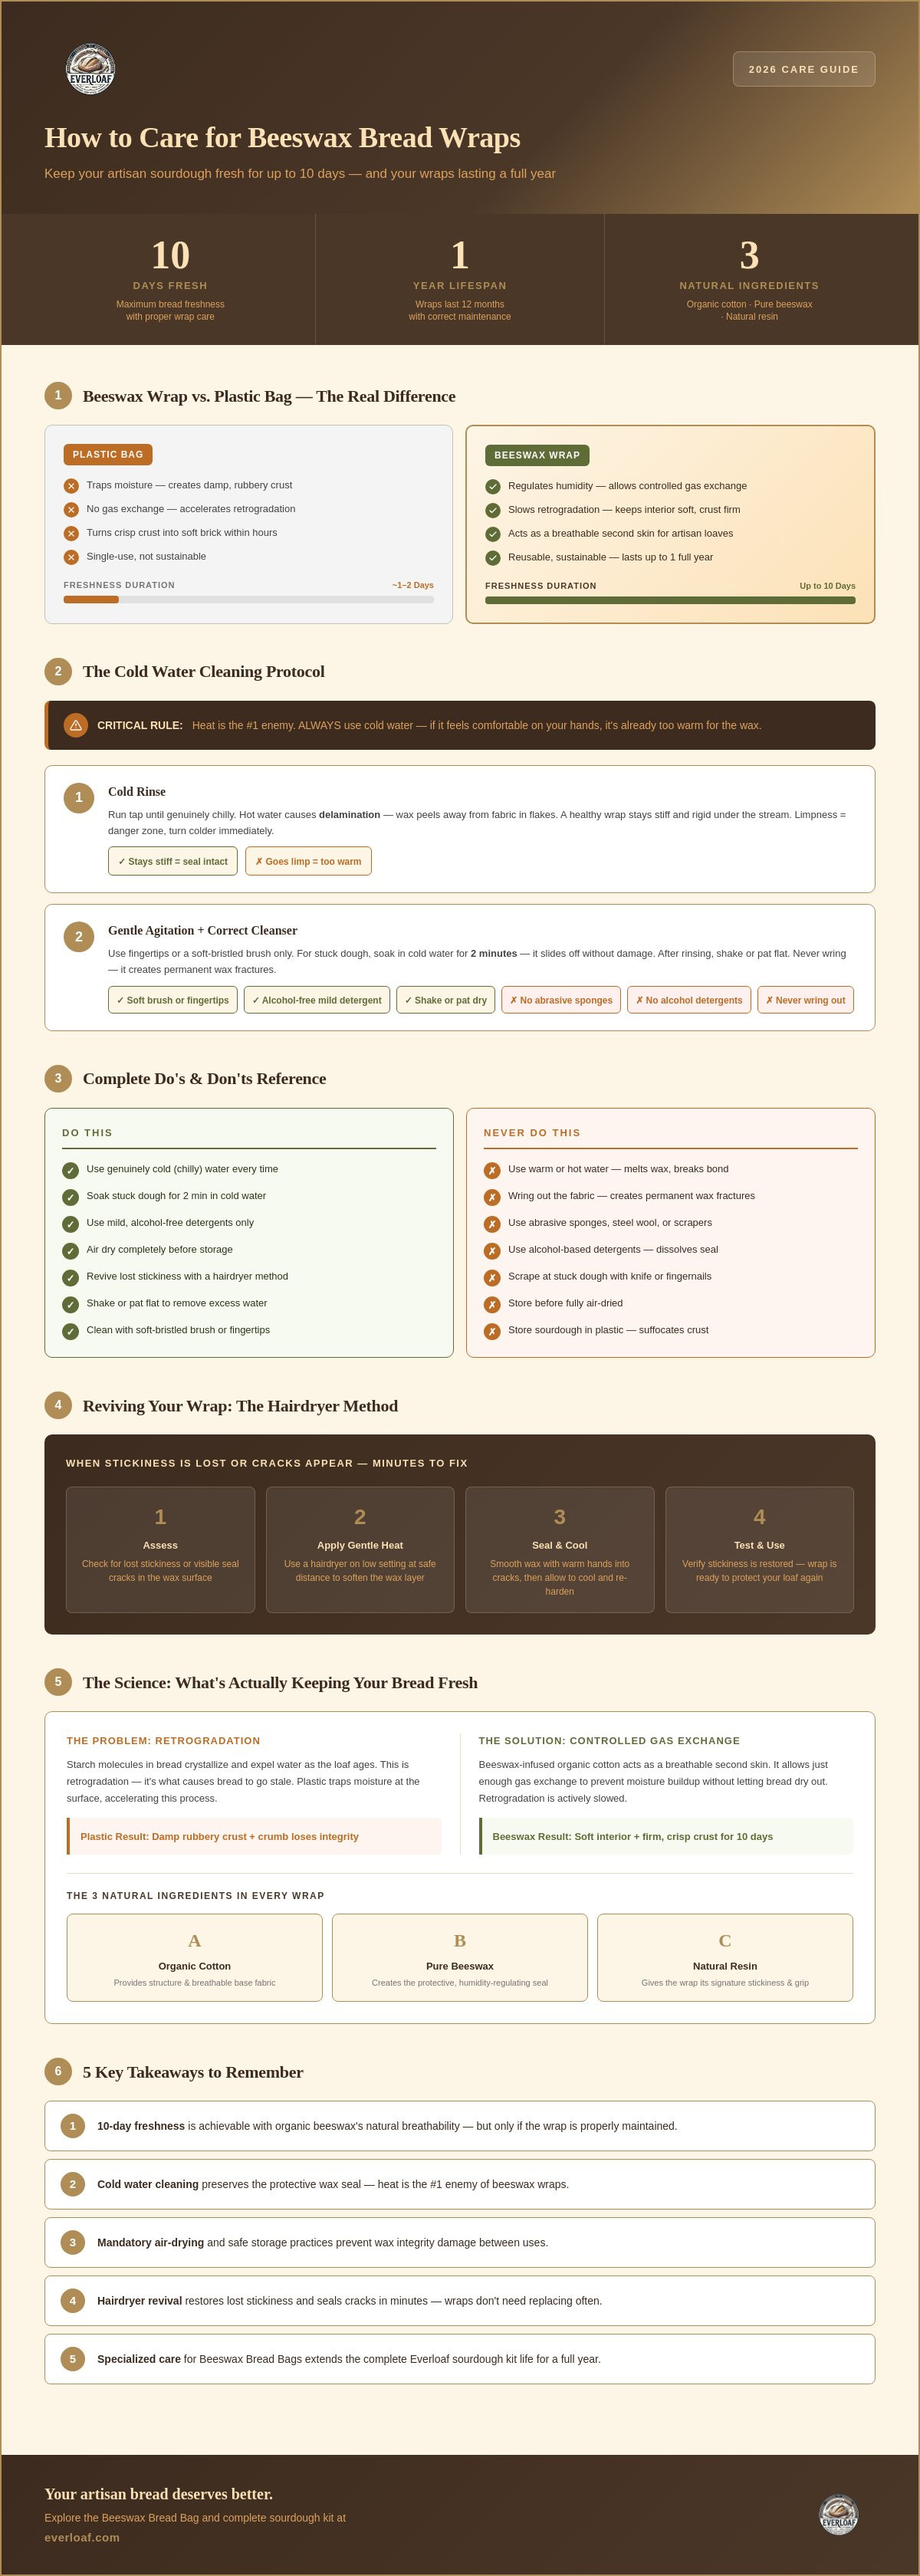
- Keep your sourdough crust crisp and fresh for 10 days by utilizing the natural breathability of organic beeswax.
- Master how to care for beeswax bread wraps with our cold water cleaning routine that preserves the protective seal.
- Avoid heat damage and maintain wax integrity with mandatory air-drying and safe storage practices.
- Restore lost stickiness and seal cracks in minutes using the simple home hairdryer revival method.
- Extend the life of your beeswax Bread Bag and Danish Dough Whisk with specialized, professional maintenance tips.
Why Beeswax Wrap Care is the Secret to 10-Day Bread Freshness
Your artisan sourdough is a masterpiece. You spent days culturing the starter and hours perfecting the fold. Do not throw all that effort away by tossing your loaf into a plastic bag. A quality Beeswax wrap is a specialized tool made from organic cotton, pure beeswax, and natural resin. It is designed to work with your bread, not against it. Understanding how to care for beeswax bread wraps is the only way to ensure your kitchen staples remain effective for the long haul. Proper maintenance is more than just cleaning. It is a sign of respect for the baking craft and the ingredients you use.
The Science of the Breathable Seal
Standard kitchen storage usually involves airtight plastic. This creates a stifling environment. Moisture from the bread's interior migrates to the surface and gets trapped there. The result is a damp, rubbery crust and a crumb that loses its integrity. Beeswax wraps function differently. The wax-infused fabric acts like a second skin. It regulates humidity levels by allowing just enough gas exchange to prevent moisture buildup. This specifically combats retrogradation, the process where starch molecules crystallize and expel water as bread ages. By slowing this process, the wrap keeps the interior soft while the exterior stays firm. Your bread stays alive and delicious instead of becoming a soggy mess.
Why Your Sourdough Deserves Better Than Plastic
Artisan bread needs to breathe to stay fresh. Plastic bags are the enemy of the perfect crust. They turn a beautiful, crunchy sourdough into a soft, unappealing brick within hours. Our community of bakers knows that organic cotton is the superior choice for maintaining that signature exterior. It provides the structure while the wax provides the seal. For those handling large, rustic loaves, the beeswax Bread Bag represents the professional evolution of the standard wrap. It offers the same breathable benefits in a format built for the artisan's kitchen. Learning how to care for beeswax bread wraps and bags ensures you hit that 10-day freshness goal every single time. Stop suffocating your crust. Treat your bread with the reverence it earned in the oven.
The Cold Water Protocol: How to Wash Your Wraps Without Damage
Heat is the ultimate predator of your sustainable kitchen tools. If you want to master how to care for beeswax bread wraps, you must embrace the cold. Warmth is for the oven; cold is for the sink. High temperatures do more than just melt the surface. They break the bond between the organic cotton and the protective wax layer. Once that bond fails, your wrap loses its soul. Maintaining the integrity of the seal is the only way to keep your bread from going stale.
Step 1: The Cold Rinse
Start by running the tap until the water feels genuinely chilly. If the temperature is comfortable for your hands, it is likely too warm for the wax. Hot water causes delamination, where the wax peels away from the fabric in unsightly flakes. Keep it cold. Watch the fabric as you rinse. A healthy, well-maintained wrap should remain stiff and rigid under the stream. If it starts to go limp, turn that dial to the cold side immediately. This stiffness is the sign of a seal that is still doing its job.
Step 2: Gentle Agitation
Use your fingertips or a soft-bristled brush to sweep away stray crumbs. This is about precision, not power. Stay away from abrasive green sponges or steel wool. These harsh tools strip the resin coating and leave your wraps defenseless against the air. When you are finished, never wring out the fabric like a standard dishcloth. Wringing creates deep, permanent fractures in the wax seal that allow moisture to escape. Simply shake it out or pat it flat to remove excess water.
Choosing your cleanser is just as vital as the water temperature. Always reach for alcohol-free, mild detergents. Alcohol is a solvent; it will dissolve your seal faster than you can rinse it away. For our dedicated sourdough community, stuck-on dough is a common battle. Do not scrape at it with a knife or your fingernails. Instead, let the wrap soak in a shallow pool of cold water for two minutes. The dough will soften and slide off without compromising the integrity of the wax. This patient approach preserves the life of your storage tools for months to come.
This same level of care applies to all your specialized storage. If you find yourself washing large wraps frequently, consider switching to a beeswax Bread Bag for a more streamlined cleaning experience. It is built with the same premium materials and demands the same respect for the cold water rule. Maintaining your tools is the best way to respect your ingredients. Keep your water cold and your standards high.
Drying and Storage: Protecting the Integrity of the Wax
Your cleaning routine is only as good as your drying process. If you have mastered the cold wash, do not ruin your progress with a shortcut. Understanding how to care for beeswax bread wraps means respecting the drying phase. This is where the wax resets and the organic cotton breathes. Treat your wraps with the same patience you give your dough during its final rise. A rushed drying process is the fastest way to compromise your storage tools.
The Proper Way to Air Dry
Air drying is mandatory. There are no exceptions. Never place your wraps in a dryer or on top of a radiator. High heat will liquidate the wax and leave you with a sticky, unusable mess. Instead, drape your wrap over a wooden drying rack or use a dedicated clothespin to hang it in a cool spot. You must ensure the fabric is 100% dry before putting it away. Trapped moisture is an invitation for mold growth. For a deeper look at why moisture management matters, read our guide on How Humidity Affects Bread Storage. A dry wrap is a safe wrap.
Keep your wraps away from the "No-Heat" zone. This includes the area directly above your dishwasher or next to your oven. Even indirect heat can soften the resin and degrade the seal over time. Direct sunlight is another hidden threat. UV rays can bleach the organic cotton and make the wax brittle. Find a neutral, shaded corner of your kitchen for the drying process. Once the wrap feels stiff and cool, it is ready for storage. This patience ensures your bread stays fresh for the full 10-day window.
Drawer Organization for the Busy Baker
A cool, dark drawer is the ideal home for your storage tools. For those using beeswax Bread Bags, avoid stuffing them into tight, crowded spaces. We recommend rolling your wraps rather than folding them. Folding creates deep, permanent creases. These creases eventually lead to "white" cracks where the wax has snapped. Rolling maintains a smooth surface and preserves the seal for a full year of use. Keep your storage area crumb-free. A clean environment ensures your wraps are ready for the next loaf without any extra prep.
Do not be alarmed by the natural honey scent of your storage. High-quality, 100% pure beeswax carries a distinct, earthy aroma. This is a hallmark of authenticity and purity. It will not transfer its flavor to your sourdough. Over time, the scent will mellow, but it remains a reminder of the natural materials protecting your bread. This is how premium storage is supposed to feel. Respect the materials, and they will respect your bread.
Reviving Your Wraps: How to Refresh the Seal at Home
Even the most resilient kitchen tools show signs of a life well-lived. After months of shielding your sourdough from the air, your wraps may begin to lose their signature grip. You might notice thin, white lines appearing across the surface. These "white cracks" are simply fractures in the wax where the fabric has been folded repeatedly. They are not a sign of failure. They are a signal that your wrap is ready for a reset. Mastering how to care for beeswax bread wraps means knowing when to intervene to restore that like-new performance.
For a complete redistribution of the wax, some advanced users prefer the oven reset. By placing the wrap on parchment paper in a 150°F oven for exactly two minutes, you can achieve a perfectly smooth finish. This is an expert-level move that requires constant supervision. If you leave the wrap in too long, the wax can soak too deeply into the paper, leaving the cotton vulnerable. For most daily maintenance, a more controlled approach is better.
The 2-Minute Hairdryer Refresh
Lay your wrap flat on a clean sheet of parchment paper. Use a hairdryer on a medium heat setting and sweep it steadily across the fabric. You will see the dull, matte surface transform into a glossy, wet-looking shine as the wax melts. This heat reactivates the resin and pulls the beeswax back into the organic cotton fibers. Once the entire surface is shiny, turn off the heat and let the wrap sit undisturbed for 60 seconds. This quick fix seals those micro-cracks and restores the "cling" that keeps your artisan crusts crisp.
The Lifecycle of Sustainable Storage
Quality materials have a clear lifespan. You should expect a premium wrap to perform at its peak for approximately 12 months. Beyond this point, you may encounter "wax exhaustion." This is different from simple dirt; it is when the fabric feels thin and the wax no longer responds to heat. When your wrap reaches this stage, it has fulfilled its purpose. Because it is made from 100% natural materials, you can cut it into strips and add it to your backyard compost. It returns to the earth as part of a perfect zero-waste cycle.
When your old wraps finally reach the end of their journey, do not settle for inferior replacements. The beeswax Bread Bag is the ultimate upgrade for the serious baker, offering a more durable structure for large artisan loaves. Treat your kitchen to tools that work as hard as you do. Proper care ensures every loaf you bake gets the protection it deserves.
Beyond the Wrap: Caring for the Complete Everloaf Sourdough Kit
Excellence in the kitchen is never an isolated event. It is a complete system. When you master how to care for beeswax bread wraps, you are securing one vital part of the journey. To achieve that legendary 10-day freshness, you must extend that same level of reverence to every tool in your kit. A holistic care routine protects your investment and ensures your artisan crusts remain the star of the table. Your tools have inherent needs. Respecting them is the only way to guarantee professional results every time you bake.
Cleaning the Orvix Bread Bag
The Orvix Bread Bag is a specialized hybrid of organic cotton and pure beeswax. It requires a slightly different approach than a flat wrap. Always turn the bag inside out before you begin the cleaning process. This ensures every stray crumb is removed from the corners where moisture can hide. For daily maintenance, a simple shake and a spot clean with a damp, cold cloth is sufficient. If the bag needs a deeper refresh, use a full cold water immersion as described in our guide on how to care for beeswax bread wraps. For more detailed instructions on this specific tool, see The Ultimate Beeswax Bread Bag Guide.
The Professional Baker’s Maintenance Checklist
Your other tools deserve the same specialized attention. The Danish Dough Whisk is a workhorse, but its wooden handle is vulnerable to the dry air of a kitchen. Season the wood with a food-safe mineral oil once a month to prevent cracking. Never leave it soaking in the sink. Similarly, your Sourdough Knife requires a sharp, protected edge to slice through thick crusts without crushing the delicate crumb. Hand wash it immediately after use and dry it with a soft cloth to prevent spotting or corrosion. We have seen that bakers who treat their equipment with care enjoy a more seamless experience.
- The Everloaf Bread Sling: Keep it bone dry between bakes to maintain its structural strength.
- Sourdough Knives: Protect the blade edge by avoiding the dishwasher at all costs.
- Danish Dough Whisk: Focus on cleaning the wire loops while keeping the wood handle dry.
Investing in high-quality tools like our beeswax cotton bread bags saves you money in the long run. You are not just buying storage; you are joining a community of sustainable home bakers who value quality over convenience. When your tools are cared for, your bread stays fresh, and your kitchen remains a place of craft. Take pride in the maintenance. It is the final step in the art of the perfect loaf.
Master the Future of Bread Freshness
Your artisan sourdough is more than just food. It's a labor of love. We have shown you that the cold water protocol and mandatory air drying are the non-negotiable pillars of storage longevity. Mastering how to care for beeswax bread wraps ensures your kitchen remains a zero-waste sanctuary where quality never fades. You now have the professional routine to keep your loaves perfect for up to 10 days. Stop settling for rubbery crusts and stale ends.
Our storage solutions are crafted from 100% organic cotton with a pure beeswax infusion for natural preservation. These tools were designed by culinary professionals from Lyon to respect the unique needs of rustic bread. It's time to treat your baking with the reverence it deserves. Keep your sourdough fresh for 10 days with the Orvix Bread Bag. Join our community of dedicated bakers and let every slice be as perfect as the first. Your craft deserves nothing less.
Common Questions from the Baking Community
Can I wash my beeswax bread wraps in the dishwasher?
Never put your wraps in the dishwasher. The intense heat will liquefy the wax and ruin the organic cotton fabric instantly. Stick to the cold water protocol to keep the seal intact. Your wrap deserves better than a high-heat cycle that strips its protective layers. Hand washing is the only way to respect the material and ensure it lasts for a full year of use.
How do I get the smell of onions or strong cheese out of my wraps?
Neutralize strong odors with a quick soak in cold water and a splash of white vinegar. For stubborn scents like onion, apply a paste of baking soda and cold water for ten minutes before rinsing. This preserves the natural honey scent of the beeswax without lingering food aromas. It is a simple way to respect the integrity of your storage while keeping your kitchen smelling fresh and clean.
Is it safe to use beeswax wraps for raw meat or fish?
Avoid using these wraps for raw meat or fish. These materials require hot water for proper sanitization to kill bacteria, which would melt your beeswax seal and destroy the fabric. Stick to bread, cheese, and vegetables to maintain a safe and hygienic kitchen environment. Your sustainable tools are specialized for breathable storage; they aren't designed to handle the heavy bacteria loads found in raw animal products.
What should I do if my beeswax wrap starts to mold?
If you spot mold, it is usually time to compost the wrap. Mold spores can penetrate deep into the organic cotton fibers, making them nearly impossible to remove safely without using heat. Prevention is your best defense here. Always ensure your wrap is 100% dry before folding it for storage in a cool drawer. A damp wrap in a dark space is an invitation for trouble you don't want.
Can I use beeswax wraps in the freezer for long-term bread storage?
You can use these wraps in the freezer for up to three weeks of bread storage. Just remember to let the wrap come to room temperature before you attempt to unfold it. Cold wax becomes very brittle and will snap if handled while frozen, creating permanent cracks in the seal. Patience is vital when moving items from the freezer back to your countertop to protect the life of the wax.
My wrap isn’t sticking anymore—is it ruined?
A wrap that doesn't stick is simply a wrap that needs a gentle refresh. Use the hairdryer method we described to redistribute the wax and reactivate the natural resin. Learning how to care for beeswax bread wraps means knowing they are rarely "ruined," just in need of a quick 2-minute reset. Once the wax is warm and glossy, it will regain its signature cling and protect your bread again.
How often should I realistically be washing my bread bag?
Wash your bread bag every three to four uses or whenever you notice crumbs starting to accumulate inside. If you are only storing dry, crusty sourdough, a simple shake-out is often all the maintenance required for the week. Trust your senses and the feel of the fabric. If the bag feels less tacky or looks dusty, it is time for a cold rinse and a bit of mild, alcohol-free soap.
Can I use these wraps for hot bread straight out of the oven?
Wait for your loaf to reach room temperature before wrapping it. Wrapping hot bread straight from the oven will melt the wax directly into your crust, ruining both the beautiful loaf and the wrap itself. Respect the cooling process to ensure your artisan crust stays crisp and your storage stays functional. Your bread needs a moment to set its crumb before it is ready for its breathable beeswax home.


