

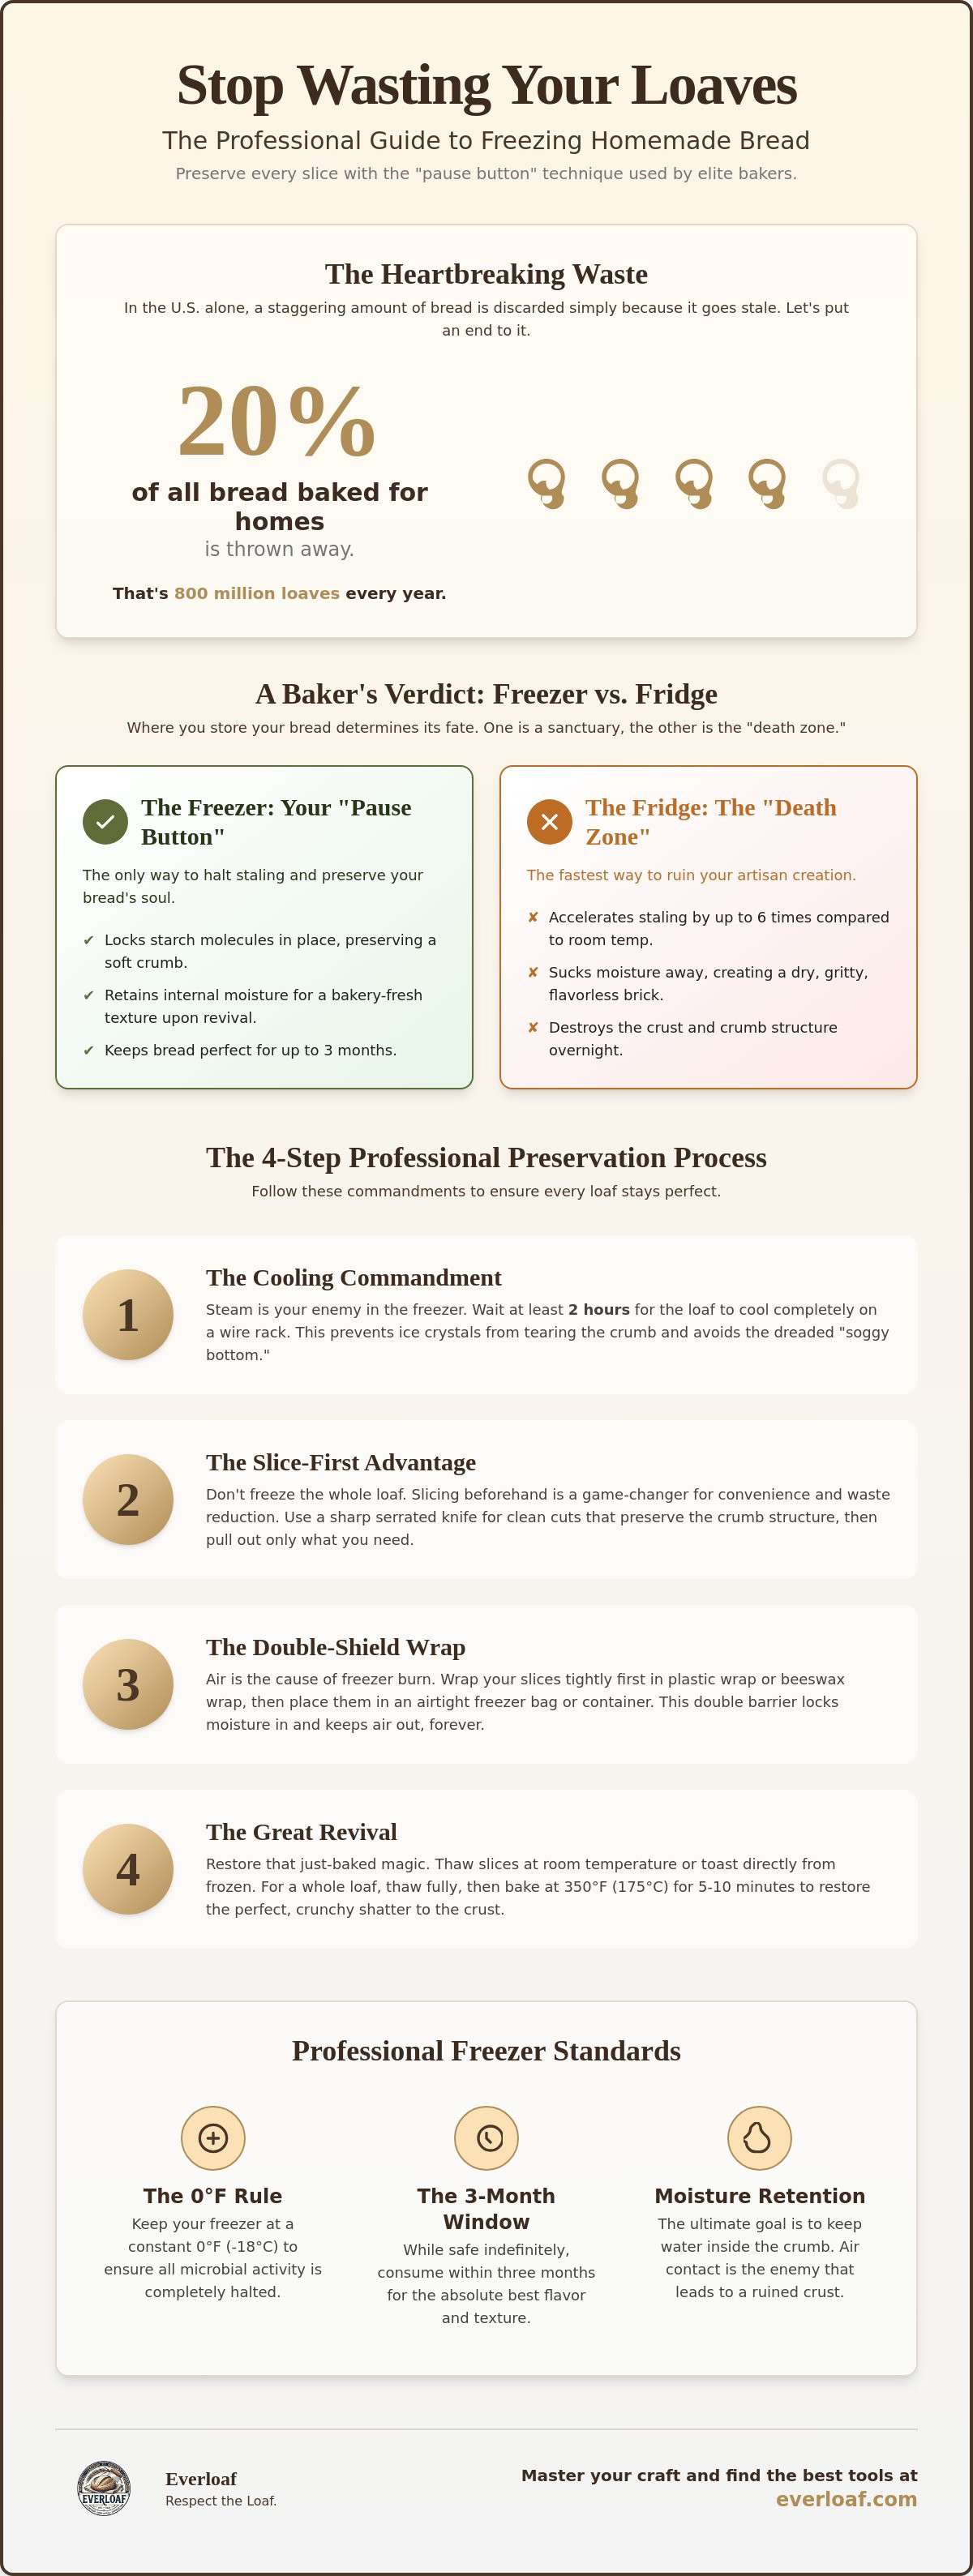
In the U.S. alone, we throw away 800 million loaves of bread every year. That is 20% of all bread baked for our homes, discarded simply because it lost its soul to staleness. You put hours of effort into your sourdough. It's heartbreaking to find half a loaf ruined by freezer burn or that dreaded rubbery texture after thawing. Learning how to properly freeze homemade bread is the only way to stop this waste and respect your craft. You deserve better than a soggy crust; your bread deserves better care.
We're here to change the way you treat your loaves. You're about to master the professional pause button technique. This guide shows you how to keep your artisan bread bakery-fresh for months. We will cover the science of moisture retention, the latest 2026 safety standards for food-safe storage, and the exact steps to revive your bread with that perfect, maximalist crunch. Stop settling for stale. Let's protect your hard work and keep every slice as perfect as the first.
Key Takeaways
- Discover why freezing is the ultimate "pause button" for your loaf and why the refrigerator is actually the "death zone" for artisan bread.
- Master the essential cooling rack method to learn exactly how to properly freeze homemade bread without the risk of a soggy bottom.
- Implement the professional "Double-Shield Wrap" technique to lock in internal moisture and prevent freezer burn forever.
- Learn the specific oven-refresh secrets that restore a perfect, crunchy shatter to your crust every time you thaw.
- Find out why specialized tools like beeswax wraps and organic cotton are the best friends for your daily, active loaves.
Stop Wasting Your Loaves: 'The Only Way to Store Bread!'
Your sourdough is a living thing. It deserves a future beyond the compost bin. When you understand the science of bread, you realize room temperature is a ticking clock. Freezing isn't just storage. It is a strategic pause button. It effectively halts the inevitable decline of your masterpiece. By mastering how to properly freeze homemade bread, you ensure your hard work stays vibrant for weeks. Don't let your artisan craft go to waste. Respect the loaf by stopping time itself.
The Science of Staling vs. Freezing
Bread doesn't just dry out; it changes at a molecular level. Starch molecules start to crystallize as soon as the loaf leaves the oven. This process makes the crumb tough and the crust leathery. Retrogradation is the process where bread loses its soul to the air. If you leave a loaf on the counter, this crystallization happens rapidly. Freezing is the only way to intervene. It drops the temperature fast enough to lock those starch molecules in place. You preserve the bakery-fresh molecular structure before it has a chance to collapse. This is how you keep that soft, pillowy interior intact for the long haul.
Freezer vs. Fridge: A Baker's Verdict
Never put your artisan bread in the refrigerator. We call it the death zone for a reason. Cold, dry fridge air accelerates staling by up to six times compared to room temperature. It turns a vibrant, open crumb into a flavorless, gritty brick overnight. The emotional cost of a ruined loaf is simply too high for any serious baker. The freezer is the only respectful choice for sourdough and yeasted loaves alike. It protects the internal moisture instead of sucking it away. While your bread waits for the deep freeze, keep your daily slices in a beeswax Bread Bag. It is the boutique standard for short-term care, bridging the gap between the oven and the freezer.
To maintain peak quality, follow these professional standards for longevity:
- The 0°F Rule: Keep your freezer at a constant 0°F to ensure microbes remain completely inactive.
- The 3-Month Window: While frozen bread is safe indefinitely, consume it within three months for the best flavor and texture.
- Moisture Retention: The goal is to keep water inside the crumb. Any air contact leads to freezer burn and a ruined crust.
Freezing is the ultimate advocate for your baking success. It allows you to bake in batches without the pressure of immediate consumption. You put love into every fold of the dough. Treat the finished product with that same level of reverence. By hitting the pause button, you ensure that every slice tastes just as incredible as it did the moment it cooled.
Preparation is Everything: 'My Loaves Stay Perfect!'
Preparation is the secret of the elite home baker. You've spent hours perfecting that crust. Don't ruin it with a rushed freeze. Understanding how to properly freeze homemade bread starts long before the loaf hits the ice. It is about respecting the cooling process. It is about choosing the right tools for the job. Our community of bakers knows that a little patience now pays off in months of freshness. The result is perfection every single time.
The 2-Hour Cooling Commandment
Steam is your best friend in the oven but your worst enemy in the freezer. Trapped moisture creates massive ice crystals. These crystals tear through the delicate crumb structure. Use the Everloaf Bread Sling to lift your masterpiece from the Dutch oven safely. Place it on a wire rack immediately. Air must circulate around the entire loaf. If the bottom stays warm, you'll suffer from "soggy bottom" syndrome. Wait at least two hours. The internal temperature must reach room temperature. A loaf that feels cool to the touch is finally ready for its deep-freeze journey. While you wait, keep your counter-top slices protected in a beeswax Bread Bag to maintain that perfect texture.
The Slice-First Advantage
Freezing a whole loaf is a common mistake. It forces you to thaw everything at once. This leads to waste. Instead, portion your bread before it enters the freezer. This strategy is a game-changer for daily convenience. Use The Sourdough Knife to get those perfect, uniform slices. A dull blade crushes the delicate air pockets in your sourdough. You want a clean cut that preserves the crumb integrity. Pre-slicing allows you to pull out a single slice for morning toast. It keeps the rest of the loaf protected and frozen. This simple step eliminates the "thaw-and-waste" cycle entirely. Your future self will thank you for the foresight. Every slice will taste like it just came out of the bakery.
Mastering how to properly freeze homemade bread is about these small, intentional steps. They make the difference between a ruined loaf and a perfect meal. Treat your bread with the reverence it deserves. The reward is a freezer stocked with artisan quality that's ready whenever you are.
The Double-Shield Wrap: 'Zero Freezer Burn Ever!'
Air is the thief of quality. You have cooled your loaf. You have sliced it perfectly with precision. Now you must defend it. Most bakers fail here by using a single, flimsy layer of protection. That is a recipe for disappointment. To master how to properly freeze homemade bread, you need a professional defensive perimeter. This double-shield method ensures your sourdough stays vibrant and protected from the harsh environment of the deep freeze. Respect the loaf by giving it the armor it deserves.
Layer 1: The Moisture Lock
Your first line of defense must be intimate. It must hug the crumb to prevent any moisture from escaping. Traditional plastic wrap or foil works; however, the 2026 landscape has changed. With new state-level bans on PFAS and "forever chemicals" in food packaging effective as of January 1, 2026, many artisans are shifting to safer materials. Our community swears by sustainable beeswax wraps for this primary layer. They provide a natural, breathable moisture lock that honors the bread. Wrap individual slices tightly. This "grab-and-go" prep makes your morning routine effortless. Ensure no "naked" bread touches the air. Exposed crust is vulnerable to ice crystals that destroy texture.
Layer 2: The Armor
One layer is a gamble. Two layers is a guarantee. Once your slices are moisture-locked, they need a secondary barrier. Place them inside a heavy-duty, reusable freezer-safe bag or an airtight container. This layer acts as a shield against physical damage in a crowded freezer. Use the "straw trick" for a DIY vacuum seal. Insert a straw into the corner of the bag, zip it almost closed, and suck out the remaining air before a final, rapid seal. This prevents the sublimation of water molecules that leads to freezer burn. Your bread stays plump. Your crust stays intact. This is the boutique standard for long-term preservation.
Don't trust your memory. Use a permanent marker to label every package with the date and type of bread. While bread is safe at 0°F indefinitely, the peak flavor profile lasts about three months. A clear label ensures you follow the "first-in, first-out" rule. This organization prevents your hard work from being forgotten in the back of the freezer. A tight, double-shield seal also blocks "freezer flavor" contamination. You don't want your delicate sourdough absorbing the scent of frozen onions or seafood. Keep the integrity of your craft pure. Your future self will appreciate the effort when that first slice tastes just-baked.
The Great Revival: 'It Tastes Just-Baked!'
The revival is the moment of truth. You have followed every step of how to properly freeze homemade bread with precision. Now, you must wake the loaf up without losing its soul. A rushed thaw is a wasted effort. Respect the process. Your bread will reward you with that just-baked aroma and a perfect, shattering crust. This is where your patience truly pays off. Every artisan loaf deserves a second chance to shine on your table.
For a whole loaf, counter thawing is the gold standard. Keep the bread inside its double-shield wrap as it sits at room temperature. This allows any surface condensation to be reabsorbed by the crust rather than pooling on your counter. It takes time, usually two to four hours depending on the size. By letting the temperature rise slowly, you protect the delicate internal crumb from becoming gummy. Once it is soft to the touch, it is ready for the final refresh. Your bread isn't just food; it is a guest that needs time to settle in.
Restoring the Crust: The Water Mist Secret
Dry heat can be cruel to a frozen loaf. To bring back the bakery-fresh experience, you need moisture. Preheat your oven to 350°F. Before sliding the loaf in, give the crust a light misting with filtered water. This steam creates a micro-climate that softens the exterior just enough to let it crisp up again without becoming a rock. It only takes 5 to 10 minutes to achieve perfection. This technique is essential for anyone learning how to maintain a crispy crust after the deep freeze. The result is a crust that shatters under the knife while the inside remains pillowy and soft.
From Frozen to Toasted in 2 Minutes
Slices are the ultimate time-saver. You don't need to wait for a full thaw. Take a slice directly from your freezer armor and drop it into the toaster. If you are handling high-moisture sourdough, use the defrost cycle. This setting warms the internal crumb before the high heat begins the Maillard reaction on the edges. You get a hot, tender center and a crunchy, golden edge. It is the perfect contrast. This method is the favorite of our community for busy mornings. It ensures no slice is ever wasted due to a lack of time.
Never use a microwave. It is the fastest way to turn an artisan masterpiece into a rubbery, inedible mess. The microwave vibrates water molecules too violently. This destroys the starch structure you worked so hard to preserve. Stick to the oven or the toaster. Your bread deserves better than a 30-second radiation bath. Respect the craft by choosing the right heat source. Once your bread is revived, store any leftovers in a beeswax Bread Bag to keep that hard-won freshness alive for your next meal.
Freshness Beyond the Freezer: 'My Sourdough Finally Lasts!'
Your freezer strategy is now a success. You have mastered how to properly freeze homemade bread to save every precious crumb. But what happens after the revival? Once your loaf is back on the counter, the clock starts ticking again. You need a storage solution that respects the living nature of your bread. Managing humidity is the final hurdle. You want to avoid the dreaded plastic "sweat" that ruins a perfect crust. This is about the "active" loaf, the bread you are enjoying today. It deserves a home that balances moisture and breathability.
The Power of Breathable Storage
Artisan bread has specific needs. It requires a micro-climate that allows it to breathe without drying out. Traditional paper bags turn your crust into a brick within hours. Plastic bags trap moisture, leading to a rubbery texture and rapid mold growth. The beeswax Bread Bag mimics the bread's natural needs perfectly. The organic cotton and beeswax blend creates a protective barrier that is both breathable and antimicrobial. It prevents mold while keeping the internal crumb soft. Understanding the science of sourdough freshness is key to this balance. When you transition a loaf from the freezer to the table, this breathable environment ensures the quality stays high until the last slice is gone.
A Plastic-Free Kitchen Legacy
The landscape of food safety is changing fast. As of January 1, 2026, several states including Minnesota and Washington have implemented strict bans on PFAS in food packaging. In June 2026, the "No Toxics in Food Packaging Act" was introduced to Congress to further protect our food. Ditching poly-bags isn't just about the environment. It is about the integrity of your flavor. Plastic often imparts a chemical scent to delicate sourdough. Lyon’s bakers have trusted natural fibers for generations for a reason. They knew that linen and cotton were the only way to honor the craft. Your bread worked hard to rise; don't suffocate it in plastic. Using natural materials is a commitment to quality that you can taste in every bite.
The Orvix standard is about this seamless transition. You move from the deep freeze to the oven refresh, and finally to the breathable bread bag. This cycle respects the effort you put into your baking. It ensures that 20% of bread wasted in U.S. homes doesn't include your kitchen. By choosing beeswax and organic cotton, you are joining a community that values longevity and sensory satisfaction. Your sourdough finally has the home it deserves. Enjoy the peace of mind that comes with knowing every slice will be as perfect as the first. Your craft is worth the extra care. Your family will taste the difference.
Honor Your Craft: The Future of Your Loaf
Your hard work deserves a perfect finish. You now have the professional blueprint to stop the clock on staling. By respecting the cooling phase and mastering the double-shield wrap, you ensure every slice remains a masterpiece. Learning how to properly freeze homemade bread is the ultimate act of respect for your craft. Preservation doesn't end at the freezer door. Once your loaf is revived, it needs a home that breathes. Your bread has inherent needs that plastic simply cannot meet.
The beeswax Bread Bag is that specialized home. It is crafted from 100% organic cotton and infused with pure beeswax for natural preservation. Our community has already saved over 50,000 loaves from the bin. This is the boutique choice for the serious baker who values longevity and flavor. Keep your thawed bread fresh for 10 days with the Orvix Beeswax Bag. Don't let another artisan crumb go to waste. Your kitchen is now a sanctuary for quality. Go forth and bake with confidence. Your future self is already reaching for that perfect, shattering crust.
Common Questions from Our Baking Community
Can I freeze bread in a beeswax bread bag?
You can use a beeswax wrap as your primary moisture-locking layer. It provides a natural, breathable barrier that honors the loaf's internal structure. Always add a secondary heavy-duty freezer bag to protect against the harsh 0°F environment. This double-shield method is the boutique standard for preserving artisan quality. It ensures your sourdough stays protected from flavor contamination while respecting the craft.
How do I prevent my frozen bread from getting soggy when it thaws?
Thaw your bread inside its original wrapping at room temperature. This allows the crust to reabsorb surface moisture rather than letting it pool on the counter. Never rush the process. A slow, steady thaw ensures the internal crumb remains pillowy and soft. Ensuring your loaf was 100% cool before freezing is also a non-negotiable step to prevent ice crystal formation.
Is it better to freeze bread whole or sliced?
Slicing is the most efficient choice for most households. It eliminates the "thaw-and-waste" cycle by letting you pull out only what you need for morning toast. Slices can go directly into the toaster for a two-minute breakfast. Only freeze whole loaves if you intend to serve the entire masterpiece at a single dinner. Slicing preserves your freedom and your bread.
What is the best way to defrost a whole loaf of sourdough?
Leave the loaf on your counter for three hours while still wrapped. Once it reaches room temperature, remove the wrap and mist the crust with filtered water. Bake it at 350°F for ten minutes to restore the signature shatter. This technique is the only way to properly freeze homemade bread and bring it back to life with that just-baked sensory experience.
How long does homemade bread stay fresh in the freezer?
Aim to consume your bread within three months for the best flavor. According to the USDA, bread stored at a constant 0°F remains safe to eat indefinitely because microbes are inactive. However, the delicate flavor profile and texture of artisan loaves will start to decline after 90 days. Label your bags with the date so you always enjoy your freshest work first.
Why does my frozen bread have white spots on it?
White, dry patches are a sign of freezer burn. This happens when air reaches the bread and sucks out the internal moisture. It ruins the flavor and creates a woody, unpleasant texture. To avoid this, ensure your primary wrap is tight and your secondary armor is airtight. Respect the loaf by sealing out the air completely. Proper protection is the advocate for your bread's longevity.


