

Is your cleaning routine actually ruining your bread’s best friend? Most people treat their storage like an afterthought, but your sourdough deserves a higher standard. Mastering the art of cleaning and maintaining beeswax bags is the only way to ensure your hard-earned crust stays bakery-fresh for up to 10 days. If you've ever feared melting the wax or felt confused by which soap to grab, you aren't alone. The global community is shifting toward these sustainable solutions for a reason, and proper care is the key to that success.
We know the effort you put into every loaf. It’s a craft that demands respect. You want a hygienic, tacky bag that lasts for years, not weeks. We're going to eliminate the guesswork and protect that vital wax coating. It's time to treat your tools with the same reverence you give your starter. You can achieve a spotless bag without sacrificing the natural properties that keep your bread alive.
This guide reveals the cold-water secrets and specific soap types that keep your beeswax bread bag in peak condition through 2026 and beyond. You'll learn how to vanish sticky sourdough residue and maintain that perfect, tacky seal. Let's make sure your kitchen staples get the specialized attention they deserve so they can keep performing for you every single day.
Key Takeaways
- Learn why heat is the ultimate enemy of your storage tools. Mastering the golden rule of cool-water care is the first step to protecting your wax seal.
- Streamline your kitchen with the 'Shake, Rinse, Dry' method. This simple routine ensures your daily maintenance is fast and effective.
- Discover the specific storage strategies that keep sourdough bakery-fresh for up to 10 days. Your hard work deserves a storage solution that actually performs.
- Master the professional art of cleaning and maintaining beeswax bags to eliminate sticky residue. We show you how to assess and revive your bag to extend its lifespan.
- Understand the signs that your bag has reached its limit. You can embrace a truly zero-waste lifestyle with products that return to the earth.
The Golden Rule of Beeswax Bag Maintenance: Keep it Cool
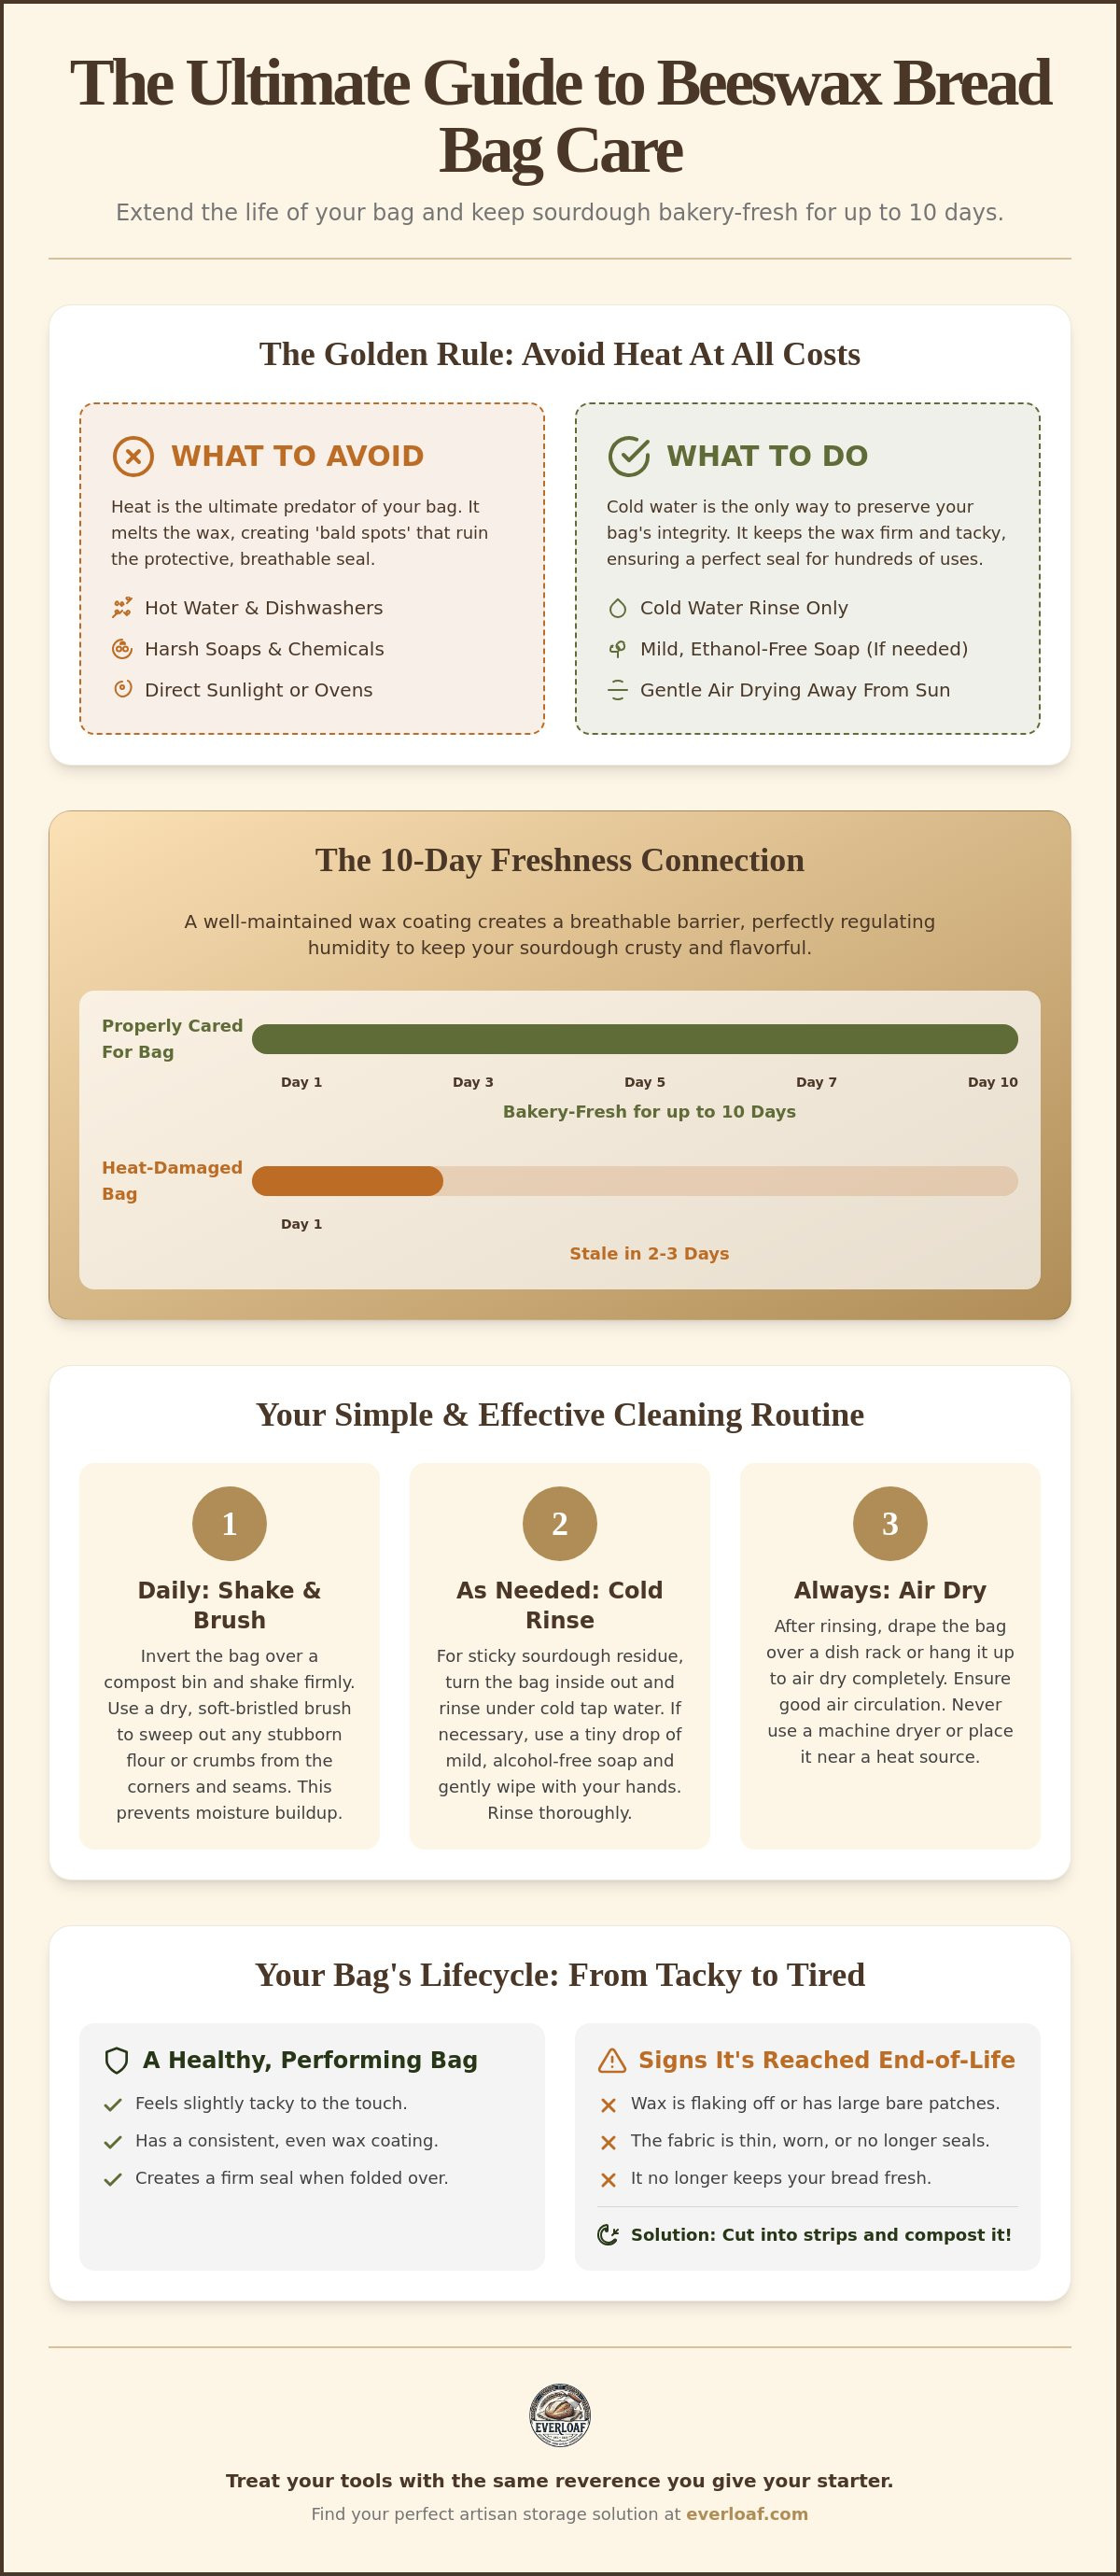
Cleaning and maintaining beeswax bags starts with a single, non-negotiable rule: avoid heat at all costs. Heat is the ultimate predator of your artisan storage gear. While beeswax technically has a melting point of approximately 144°F, the damage begins much earlier. Even warm water can soften the wax enough to compromise its protective seal. When you use heat, you are effectively stripping the life out of the organic cotton fibers. Cold water is the only way to preserve the structural integrity of your bag for the long haul. It keeps the wax exactly where it belongs. If you aren't using cold water, you aren't truly cleaning; you're degrading. The standard for excellence in 2026 is cold-water maintenance. It’s the only way to honor the work you put into every bake.
We see too many enthusiasts lose their favorite bags because of a simple temperature mistake. It’s a tragedy for the craft. Your sourdough takes days to perfect. Your storage should be treated with the same reverence. Our community of bakers knows that quality tools require quality care. Don't settle for a mediocre routine that leaves your bread dry and your bag ruined. A clean, cold rinse is the secret to a bag that lasts for years. It protects your investment and ensures your kitchen remains a place of high-quality results.
Why Heat is the Enemy of Your Bread Bag
The bond between the wax and the cotton is a delicate partnership. In a quality Beeswax wrap or bag, the wax is deeply infused into the fabric weave. Hot water acts as a solvent. It breaks that infusion and creates 'bald spots' on the fabric. These spots are vulnerable zones where air can leak in and moisture can escape. This is the primary reason why dishwashers are the number one cause of product failure. The high temperatures and harsh chemicals destroy the wax-to-cotton bond instantly. Your bag is a specialized tool. It doesn't belong in a machine. It belongs in your hands, under a cool tap. Treat the fabric with respect and it will stay tacky for hundreds of uses.
The 10-Day Freshness Connection
The state of your wax directly dictates the life of your loaf. A perfectly maintained beeswax Bread Bag is a master of humidity control. It creates a breathable barrier that mimics the natural environment your bread needs. When the wax is thick and tacky, it prevents sourdough from 'sweating' in its own moisture. It also stops the air from turning your crust into a rock. We rely on the science of sourdough freshness to prove that moisture regulation is everything. Without a healthy wax coating, your bread won't stand a chance. Keep the bag cool, and your sourdough will stay bakery-fresh for 10 days. It's that simple. High standards in maintenance lead to high-quality meals.
Step-by-Step: How to Clean Your Beeswax Bread Bag Properly
Cleaning and maintaining beeswax bags requires a strategy tailored to your kitchen's rhythm. If you're a daily baker, your bag works overtime. It collects flour, trapped moisture, and the occasional sourdough smear. You don't need a full wash every time you finish a loaf. Instead, adopt a routine that respects the wax while keeping the interior pristine. Most generic advice fails to distinguish between a small wrap and a high-capacity bread bag. We treat our tools differently because they serve a higher purpose. Your routine should be as consistent as your starter feedings. High standards in the kitchen demand high standards in maintenance.
The Daily Shake-Out for Crumbs
Start with the basics. Invert your bag over a compost bin and give it a firm shake to dislodge loose crust and seeds. For stubborn flour buildup, use a dry, soft-bristled brush to sweep the corners. This prevents old flour from becoming a playground for moisture. The 'dry-clean' method is defined as the process of removing dry debris using physical force or brushes without the introduction of water or soap. It’s the most efficient way to maintain hygiene between bakes without stressing the wax coating. Keep it simple. Keep it dry.
- Invert the bag completely to reach the bottom seams.
- Use a dedicated pastry brush for fine flour particles.
- Shake daily to prevent crumb accumulation.
The Deep Rinse for Sticky Residue
Sometimes a shake isn't enough. If you find sticky residue from a particularly hydration-heavy loaf, it’s time for a cool rinse. Submerge the bag in cool water with a single drop of mild, alcohol-free dish soap. Avoid alcohol at all costs. It acts as a solvent and will dissolve your wax infusion. Use a soft cloth to gently wipe away sourdough smears. Never scrub the surface. Scrubbing creates friction and heat, which causes the wax to flake off the cotton. As noted in the Good Housekeeping guide to beeswax wraps, gentle handling is the key to longevity. This process keeps the bag hygienic without compromising its tacky seal.
Your bag is a living part of your sourdough process. It breathes. It protects. It deserves a cleaning routine that matches the quality of the bread inside. If you haven't upgraded your storage yet, our beeswax Bread Bag is designed for this exact level of care and performance. Treat your tools with reverence and they will reward you with 10-day freshness. Don't let a lazy cleaning habit ruin a masterpiece. Master the rinse and protect the wax.
Drying and Storage Strategies for Maximum Longevity
Drying is the silent partner in the cleaning process. If you focus only on the wash, you’re missing half the battle. Moisture is the ultimate enemy of organic fibers. If you leave your bag damp, you’re creating a playground for mold. It’s a tragedy to lose a high-quality tool to a simple drying mistake. Air drying is the only acceptable method for cleaning and maintaining beeswax bags. Never use a machine dryer. Never touch it with an iron. The heat will liquefy the wax and ruin the infusion immediately. Your bag deserves a slow, natural finish to stay in peak condition.
We believe in treating your kitchen essentials with reverence. A well-dried bag feels different. It maintains its structural integrity and remains ready for your next bake. Our community knows that patience is a vital part of the craft. Don't rush the process. Let the air do the work. A bone-dry bag is a hygienic bag. It’s the standard we set for every loaf we store.
Air Drying Without the Sun
Drape your bag over a clean bottle or a dedicated drying rack. This ensures air circulates inside and out. Keep it away from windows. UV rays are a hidden threat to natural beeswax. They degrade the wax compounds and bleach the organic cotton over time. You want a cool, shaded spot with good airflow. Ensure the interior is bone-dry before you even think about folding it. Even a hint of moisture can compromise the wax seal during storage. Respect the material and it will protect your bread for years.
Smart Kitchen Storage Locations
Where you store your bag matters. Your kitchen is full of hidden hot spots that can kill the wax's tackiness. The top of the refrigerator is a common trap. It radiates constant heat that softens the wax 24/7. Keep your bags in a cool, dry drawer away from the oven or toaster. A stable temperature keeps the grip strong. Avoid tight folds that create permanent creases. Hard creases can lead to cracking in the wax coating. Instead, keep your bags flat or loosely rolled. This preserves the uniform seal of your beeswax Bread Bag. Treat the fabric like a fine garment. It’s a specialized tool that requires a specialized home. When you store it correctly, you’re ensuring that 10-day freshness for every sourdough loaf.
Troubleshooting: Reviving a Tired Beeswax Bag
Stop letting your bag fade into a limp, useless piece of fabric. A true artisan knows that tools require maintenance to stay at peak performance. Cleaning and maintaining beeswax bags involves more than just a quick rinse; it requires a professional assessment every 6 months. Look for signs of wear like 'pilling' or a noticeable loss of stickiness. If your bag feels smooth rather than tacky, it’s losing its ability to protect your sourdough. Don't wait for the bag to fail and ruin a 48-hour ferment. Address these issues early to extend the life of your investment. A well-cared-for tool is a badge of honor in a serious kitchen.
We treat our gear with reverence because we understand the craft. If your bag looks tired, it’s a reflection of your process. Our community doesn't settle for mediocre storage. We demand longevity and performance. The beeswax Bread Bag is engineered to be a long-lasting partner in your baking journey. It’s a premium investment that rewards your attention with consistent, bakery-fresh results. When you master the art of the revival, you ensure your kitchen remains a zero-waste sanctuary of quality.
Dealing with Sourdough Smells and Stains
Trapped moisture can lead to off-odors that compromise your bread's flavor profile. If your bag develops a funky scent, use a diluted vinegar rinse for natural deodorizing. Mix one part white vinegar with four parts cool water and give it a gentle soak. Minor staining from crust char or flour dust is completely normal and safe. It shows that your bag is working hard. These natural, earthy smells are a definitive sign of organic quality and authentic materials. Embrace the character of a well-used bag while keeping it hygienically sound.
The 'Palm Warmth' Trick for Better Grip
You don't need a heat gun or an oven to fix a lack of stickiness. Use the natural heat of your hands to reactivate the wax before sealing your loaf. Simply wrap your hands around the bag and apply firm pressure for 30 seconds. Friction creates the perfect airtight environment by softening the wax just enough to bond the folds together. This gentle, human heat is the only temperature change your bag should ever experience. It stands in direct contrast to the destructive heat of dishwashers or irons. This simple trick restores the seal and ensures your sourdough stays protected. Upgrade your kitchen game and buy the beeswax Bread Bag to experience a storage solution that actually responds to your care.
Sustainability and the End of the Life Cycle
Even the most dedicated artisan tools eventually reach their limit. Respecting the natural lifecycle of your gear is a core part of the Everloaf philosophy. While cleaning and maintaining beeswax bags extends their utility, there comes a day when the wax has given its all. Our bags aren't meant to sit in a landfill for centuries. They are designed to return to the earth with the same grace they brought to your kitchen. A zero-waste profile isn't just a marketing claim. It's a commitment to the environment and the craft we love. It’s about leaving nothing behind but the memory of great bread.
We celebrate the end because it marks a new beginning. Your bag has protected dozens, perhaps hundreds, of loaves. It has earned its rest. When you choose organic materials, you’re choosing a path of responsibility. Don't let a worn-out bag compromise your sourdough. High standards require knowing when to transition to fresh tools. It’s part of the process. It’s how we maintain excellence in every slice. Our community knows that quality is a journey, not a destination.
When is it Time to Replace Your Bag?
Perform a final audit of your storage. Look for thin spots where the organic cotton fibers are clearly visible through the wax infusion. If the bag no longer holds its shape when you fold it, the structural integrity is gone. A bag that won't stay sealed cannot regulate humidity. At this stage, cleaning and maintaining beeswax bags is no longer effective. It’s time for a fresh start. You can find the latest beeswax bread bags to restore your 10-day freshness guarantee. Don't settle for a failing seal. Your sourdough deserves the best protection available.
Composting and Upcycling Ideas
The beauty of 100% organic cotton and beeswax is its versatility. Your bag's life doesn't have to end in the bin. Cut your old bags into thin strips to use as natural garden ties. They’re perfect for supporting delicate tomato plants or climbing vines. You can also use small pieces as highly effective fire starters for your next wood-fired oven session. If you prefer a simpler exit, toss the remaining fabric into your backyard compost pile. These organic materials return to the earth in 6 to 12 months. It’s a clean, circular ending that honors the planet. Share your upcycling wins with our community! We love seeing how you give your bags a second life. It’s about respect for the material and the world we share.
Master the Art of Lasting Freshness
Respecting your tools is the final step in the baking process. You now have the professional framework for cleaning and maintaining beeswax bags to ensure peak performance. Cold water is your greatest ally; heat is the ultimate enemy. By mastering the 'Shake, Rinse, Dry' method and using hand-warmth for revival, you protect the integrity of your storage. Your hard-earned sourdough deserves an environment that regulates humidity and maintains its bakery-fresh crust for 10 days.
When your current bag has finished its lifecycle, upgrade to a tool built for longevity. Our bags are crafted from 100% organic cotton and infused with pure, local beeswax. They were designed by culinary professionals from Lyon to meet the high standards of our baking community. Experience the difference that professional-grade materials make in your kitchen. Keep your sourdough fresh with the Orvix Beeswax Bread Bag.
Take pride in every loaf and every tool. Your commitment to the craft is what makes the results extraordinary. Keep baking, keep caring, and enjoy every perfect slice.
Frequently Asked Questions
Can I use soap when cleaning and maintaining beeswax bags?
Yes, you can use soap, but only mild, alcohol-free varieties. Alcohol acts as a solvent and will strip the wax infusion from the cotton fibers. Use a tiny drop with cool water only when you encounter sticky residue. Cleaning and maintaining beeswax bags requires this gentle touch to protect the seal. Avoid harsh chemicals that compromise the organic integrity of your bag.
How often should I wash my beeswax bread bag?
Wash your bag only when you see visible residue or smears. For daily upkeep, a firm shake-out over a compost bin is sufficient to remove crumbs. Over-washing under water can lead to premature wear of the wax coating. Respect the material by minimizing its contact with moisture. A deep rinse should be a monthly occurrence rather than a daily chore.
Is it safe to store warm bread directly in the bag?
Never place warm bread directly into the bag. Beeswax begins to soften well before its melting point of 144°F. Residual heat from a fresh loaf will liquefy the wax and ruin the infusion immediately. Wait until your sourdough is completely cool at room temperature. This protects the structural integrity of the bag and prevents the bread from sweating against the wax surface.
What should I do if my beeswax bag starts to smell like old bread?
Use a diluted vinegar rinse to eliminate trapped odors. Mix one part white vinegar with four parts cool water and give the bag a quick, gentle soak. This natural deodorizer neutralizes smells without damaging the wax compounds. Ensure the bag is bone-dry before its next use. A fresh scent is a sign of a healthy, hygienic storage environment for your next bake.
Can I use a beeswax bag for meat or cheese as well?
You can use the bag for hard cheeses, but never for raw meat, poultry, or fish. Raw proteins require hot water for safe sanitization, and hot water destroys the beeswax coating. Stick to bread, produce, and hard cheeses to maintain food safety in your kitchen. The inability to use heat makes raw meat storage a dangerous choice for these organic materials.
How do I remove mold if I accidentally left damp bread in the bag?
Wipe surface spots with a vinegar-soaked cloth if the mold hasn't penetrated the fibers. However, if mold has moved into the cotton weave, the bag has reached its limit. Safety comes first in the craft of baking. It is better to compost a compromised bag than to risk your health. Always ensure total dryness after cleaning and maintaining beeswax bags to prevent this issue.
Does the beeswax scent transfer to my sourdough loaves?
You might notice a faint, sweet honey scent when the bag is brand new. This is a hallmark of pure, local beeswax and rarely transfers to the flavor of your sourdough. Most enthusiasts find the natural aroma pleasant and reassuring. The scent fades naturally over the first few weeks of use. It is a sign of authentic, high-quality materials protecting your bread.
How long does a high-quality beeswax bread bag typically last?
A high-quality bag typically lasts about one year with consistent, proper care. Cleaning and maintaining beeswax bags according to our professional guidelines ensures you get the maximum lifespan from the wax. Eventually, the infusion will thin and lose its grip. When it no longer holds a seal, it is time to transition to a fresh bag and return the old one to the earth.


