

Your home oven is lying to you about its potential. You spend days nurturing a starter, only to pull out a loaf with a tough, rubbery crust. It is a heartbreak every baker knows well. Texture is the primary driver of enjoyment for 71% of bread lovers, yet achieving that bakery-quality crunch at home often feels like a mystery. Selecting the right essential tools for sourdough baking is the first step toward reclaiming your craft. You deserve results that honor your effort.
We understand the frustration of inconsistent oven spring and the struggle to manage steam in a standard kitchen. It is time to stop guessing and start mastering the science of heat. This guide explores the critical differences between baking on a stone and using a Dutch oven. We promise to help you choose the tool that fits your space and your production goals. You are about to discover how to produce thin, shattering crusts that last for days. Let's transform your kitchen into a professional-grade bakery together.
Key Takeaways
- Master the science of moisture to achieve a shattering, bakery-quality crust that honors your hard work.
- Unlock the "set it and forget it" power of the Dutch oven to automate a perfect, humid baking environment.
- Scale your production by using a baking stone to bake multiple boules or baguettes at the same time.
- Explore the essential tools for sourdough baking to find the perfect balance between simple convenience and high-volume output.
- Learn why the cooling ritual is the final, non-negotiable step to keeping your crust crisp and your crumb tender.
The Science of Steam: Why Your Baking Surface Matters
Steam is your invisible ally. It is the secret ingredient for professional artisan bread. Without it, your loaf is doomed. Most home bakers ignore the physics of their oven. They treat the baking surface as a simple shelf. This is a mistake. Your choice of surface is one of the most essential tools for sourdough baking. It dictates how energy reaches your dough. It determines if your loaf will soar or stumble.
A dry oven is a hostile environment. Without humidity, the surface of your dough dehydrates instantly. It forms a rigid shell before the interior has a chance to expand. This kills your oven spring. You end up with a dense, heavy crumb and a dull, greyish crust. Professional results require you to master two pillars: heat retention and moisture control. You must balance how the oven delivers energy to your bread. There are two primary types of heat at play:
- Conductive Heat: This is energy transferred directly from the hot stone or iron to the base of your loaf. It creates the initial "pop."
- Radiant Heat: This is energy moving through the air. In a dry oven, radiant heat is a thief that steals moisture from your crust too early.
Starch Gelatinization and the Oven Spring
Steam allows for starch gelatinization on the surface of your loaf. This process creates a thin, flexible layer of "gel." This layer stays supple. It allows the dough to stretch as the gases inside expand. If you lack moisture, the crust sets too early. This leads to the dreaded "football loaf." The bread becomes compressed and tough. A humid environment ensures the crust remains thin. It eventually becomes audibly crackly. It is the difference between a rubbery bite and a shattering crunch.
Thermodynamics of the Home Oven
Your home oven is designed to vent moisture. This is great for roasting chicken. It is terrible for artisan bread. To succeed, you must fight the oven's natural tendency to stay dry. This is why understanding how Dutch ovens create steam is vital. By trapping the dough's own moisture, you create a specialized micro-climate. Surfaces like stones or cast iron store massive amounts of energy. They release this energy steadily. This helps maintain 450°F+ temperatures even when you introduce humidity. Choosing high-quality essential tools for sourdough baking ensures your oven works for you, not against you.
The Dutch Oven: Instant Professional Crust for Beginners
The Dutch oven is the ultimate shortcut to bakery-quality results. It is a self-contained steam chamber that automates the hardest part of home baking. While professional ovens use steam injectors, your home oven vents moisture away. The Dutch oven solves this by trapping the dough's own moisture inside a sealed space. This creates a humid micro-climate that keeps the surface supple. It is one of the most essential tools for sourdough baking for those who value consistency. It just works.
This method gained massive popularity through the original no-knead bread recipe published in 2006. It proved that you don't need a professional setup to achieve a thin, shattering crust. The secret lies in the heat mass. Heavy cast iron stores a tremendous amount of energy. It releases this heat evenly to the dough. Thin ceramic or glass options often struggle to maintain the intense 450°F+ temperatures needed for a dramatic oven spring. Cast iron is the gold standard for a reason.
However, the Dutch oven has its limits. You are usually restricted to baking one loaf at a time. There is also a recurring risk of burnt bottoms if the pot sits too close to the oven's heating element. Despite these hurdles, the results are undeniably superior for beginners. It removes the guesswork from moisture management.
The Sealed Environment Advantage
By using a heavy lid, you eliminate the need for messy spray bottles or dangerous pans of boiling water. The loaf provides its own steam as it heats up. This moisture prevents the crust from setting too early. It allows the bread to expand fully before the surface hardens. This "set it and forget it" approach works perfectly for enthusiasts who want professional results without technical stress. It ensures success even in poorly sealed home ovens.
Mastering the Transfer
The most dangerous moment in baking is the transfer. Dropping delicate dough into a 500-degree cast iron pot is stressful. You risk burning your hands and degassing your carefully fermented dough. This is where specialized accessories become vital. Using the Everloaf Bread Sling allows for safe, centered placement every time. You can lower your loaf gently into the heat without a single burn. This precision keeps the dough's internal structure intact. It ensures your final loaf looks as good as it tastes. Once your masterpiece is cooled, protect that hard-earned texture by using an Everloaf beeswax cotton bread bag to maintain freshness.
Baking on a Stone: Scaling Up Your Artisan Production
The Dutch oven is a safety net. It is perfect for beginners. But eventually, you will outgrow the single-loaf limit. If you want to bake for the whole neighborhood, you need a baking stone. It is one of the most versatile essential tools for sourdough baking. It gives you the freedom to bake baguettes, batards, and boules simultaneously. You are no longer restricted by the shape of a cast iron pot. Your home oven becomes a blank canvas for your creativity.
Stones excel at heat delivery. They provide intense conductive heat directly to the base of your dough. This creates a superior under-crust. It is the secret to a loaf that sounds perfectly hollow when tapped. Beyond bread, a stone transforms your oven into a professional pizza hearth. It is a permanent workhorse that earns its place on your oven rack. However, the stone demands more from you. You must become the master of your environment.
Mastering the stone requires a deep respect for the science of bread making. Since there is no lid to trap moisture, you must build the steam yourself. This is where many home bakers fail. They don't provide enough humidity to keep the dough supple. When you manage it correctly, the result is a thin, glassy crust that a Dutch oven simply cannot replicate.
Creating External Steam
Don't rely on a simple spray bottle. It isn't enough. Professional results require a heavy steam load. Place a cast iron skillet filled with lava rocks on the bottom rack. Pour boiling water over them just as you load your bread. This creates an immediate, violent burst of steam. Another favorite is the rolled towel method. Soak towels in hot water and place them in a pan. This creates a steady, long-lasting steam release. Vent the oven 15 minutes before the bake ends. This allows the moisture to escape so the crust can harden and crisp.
Stone vs. Steel: The Modern Alternative
Every baker eventually faces a choice between ceramic and steel. Steel has much higher thermal conductivity. It transfers heat faster than ceramic. This leads to an explosive oven spring and a darker bottom crust. However, stones are more forgiving for delicate bakes. Ceramic stones are fragile. They can crack if they experience thermal shock. Never put a cold stone into a hot oven. Always choose a thickness of at least 1/2 inch. This ensures your essential tools for sourdough baking can maintain temperature even when the oven door is open.
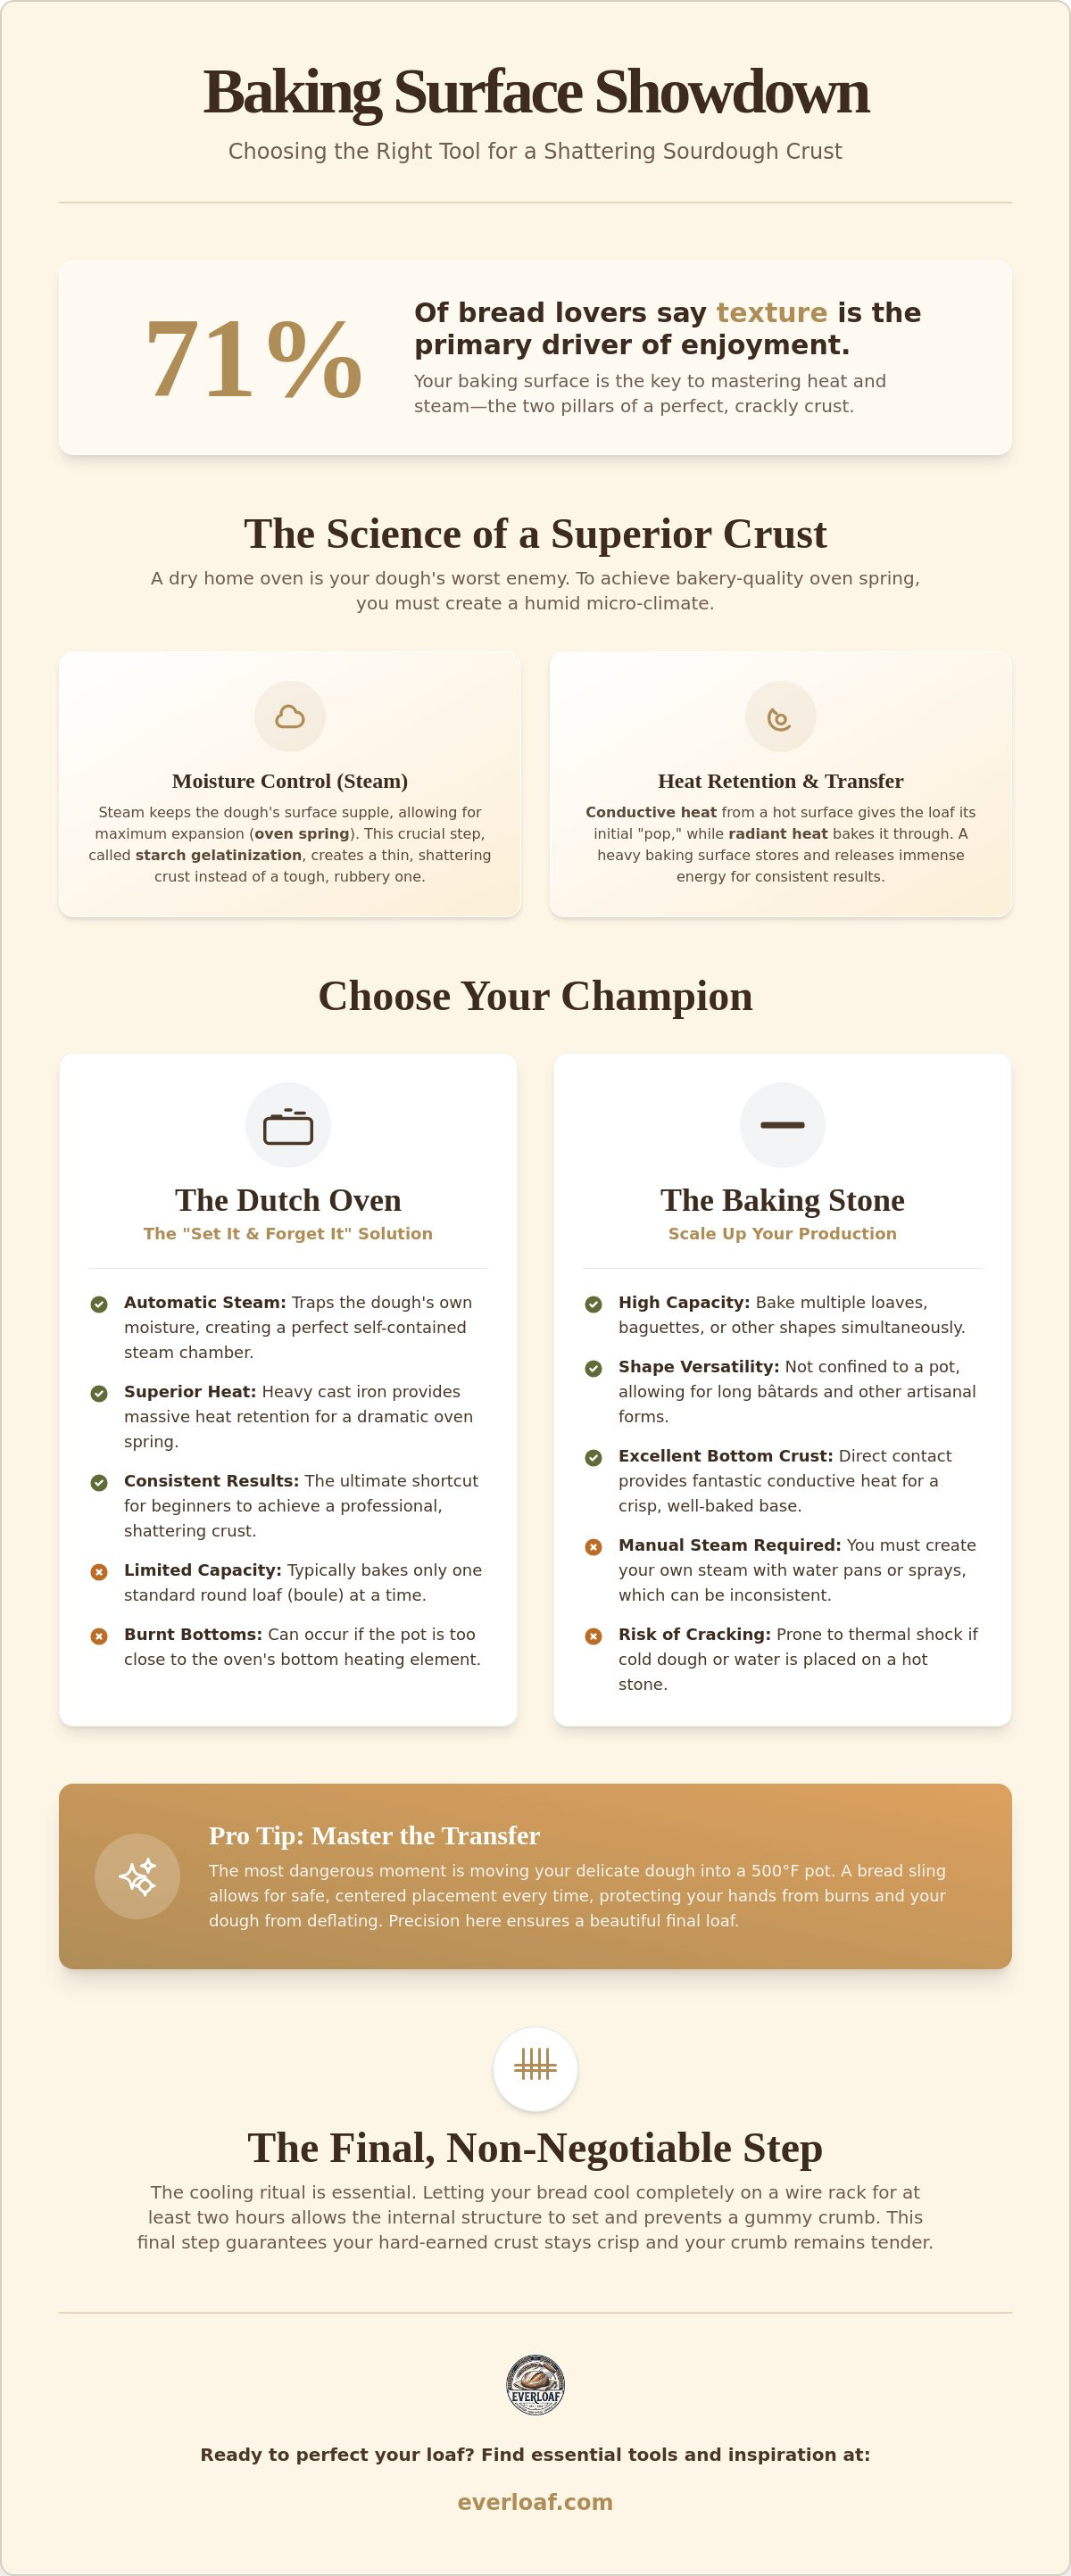
Stone vs. Dutch Oven: A Comparison Framework for Your Kitchen
Every baker reaches a crossroads. You must eventually choose between convenience and volume. This decision defines your daily workflow and the final quality of your loaves. Selecting between these essential tools for sourdough baking isn't just a matter of preference. It's about your lifestyle and your kitchen's physical limits. You are choosing the foundation of your bake.
Consider your oven's recovery time. Every time you open the door to load a stone, heat vanishes. A thick cordierite stone holds onto energy, but it takes longer to preheat. Cast iron is different. It is a dense, contained environment that recovers its temperature almost instantly once the lid is closed. This makes the Dutch oven a reliable partner for those who don't want to micromanage their oven's internal temperature. It is a tool that respects your time.
The cost of entry also plays a role. A high-quality cast iron Dutch oven is an investment in lifetime durability. A cordierite stone is often more affordable but carries a risk of cracking if handled improperly. You must also consider your dough's hydration. High-hydration doughs (80% or more) tend to spread on a flat stone. The walls of a Dutch oven act as a girdle. They force the dough upward, ensuring a dramatic vertical rise even when your shaping isn't perfect.
Feature Comparison at a Glance
Use this table to evaluate which tool aligns with your goals.
| Feature | Dutch Oven | Baking Stone |
|---|---|---|
| Steam Management | Automatic (Sealed) | Manual (External) |
| Loaf Capacity | Single Loaf | 3 to 4 Loaves |
| Versatility | Limited to Boules | High (Baguettes, Pizza) |
| Skill Level | Beginner Friendly | Advanced Artisan |
The Dutch oven is the Beginner’s Shortcut; the Stone is the Artisan’s Scalpel. Proper hydration is the foundation of a great loaf regardless of your surface. Use a Danish Dough Whisk to ensure your flour and water are perfectly incorporated before the fermentation begins.
Which Should You Choose?
Your baking frequency dictates your choice. If you bake one masterpiece a week for yourself, the Dutch oven is your best friend. It is simple. It is consistent. It's almost impossible to fail. However, if you are gifting loaves to neighbors or hosting large dinners, the baking stone is essential. It allows you to maximize your oven space and bake multiple shapes at once. Always consider the weight of cast iron. It is heavy. If you have limited storage or struggle with lifting heavy pots, a stone might be the more practical addition to your essential tools for sourdough baking.
Once you've mastered the bake, protect your hard work. Store your finished loaves in an Everloaf beeswax cotton bread bag to preserve that perfect, shattering crust.
The Post-Bake Ritual: Preserving Your Crust After the Oven
You've mastered the heat. You've conquered the steam. Your kitchen smells like a dream. Now, don't throw it all away. Most bakers treat storage as an afterthought. This is a tragedy. Your storage method is just as vital as your baking surface. It is the final, non-negotiable piece in your collection of essential tools for sourdough baking. Respect the craft. Protect your results.
Cooling on a rack is the final bake step. It is not a suggestion. As your bread cools, moisture moves from the center to the surface. If you trap that moisture, you kill the texture. This is starch retrogradation in action. It is the science of staling. You worked for days on this loaf. Don't suffocate your success. Give it the air it needs to set properly. A cooling rack ensures your crust stays crisp while the crumb stabilizes.
Natural storage is about balance. You want to prevent the bread from drying out without making it soggy. Your choice here is as important as choosing between a stone and a Dutch oven. It is about longevity. It is about emotional satisfaction. You want that first-day crunch to last. This requires a specialized approach to humidity control that honors the effort you put into the bake.
The Plastic Bag Mistake
Plastic is a prison for artisan bread. It traps every drop of evaporating moisture against the crust. Within hours, your shattering crust turns into a rubbery mess. It is a heartbreaking waste of talent. Paper bags are not the answer either. They are too porous. They lead to rock-hard sourdough by day two. You need a middle ground. Learn more about how to store homemade bread to maintain a crispy crust to avoid these common pitfalls.
The Beeswax Solution
The beeswax Bread Bag is the ultimate solution for artisan loaves. It uses organic cotton infused with beeswax to create a breathable barrier. This mimics the natural protection of the crust itself. It allows just enough moisture to escape to keep the crust crunchy. It keeps enough inside to keep the crumb soft. It is one of the most essential tools for sourdough baking for serious enthusiasts. You can keep your sourdough fresh for up to 10 days without a single chemical. It is a modern, design-conscious way to treat your bread with the reverence it deserves. Your loaves have needs. Meet them with quality.
Master the Art of the Artisan Crust
Your journey from a rubbery crust to a professional shatter starts with the right surface. Choose the Dutch oven for automated ease or the baking stone to scale your production. Both are essential tools for sourdough baking that honor your dedication to the craft. But your work doesn't end when the timer beeps. The final secret to bakery-quality bread is how you treat it after it leaves the heat. You must protect the texture you worked so hard to create.
Don't let a plastic bag undo your hard work. Our beeswax Bread Bag is designed by leading culinary experts. It is crafted from 100% organic cotton and infused with pure beeswax for natural preservation. This bag respects the inherent needs of your loaf. It provides the perfect balance of breathability and moisture control. It is the specialized attention your bread deserves. It ensures your crust stays thin and crispy while the crumb remains tender.
Keep your crust crispy for 10 days with our Beeswax Bread Bag. You have mastered the science of heat and steam. Now, give your artisan loaves the home they need to stay fresh and crunchy. Your kitchen is ready for greatness. Happy baking!
Frequently Asked Questions
Is a baking stone better than a Dutch oven for sourdough?
Neither tool is objectively superior; your choice depends on your specific baking goals. Dutch ovens are the gold standard for beginners because they automate steam management and ensure consistent results. Baking stones are better for volume and variety. If you want to bake three baguettes at once, the stone is one of the most essential tools for sourdough baking you can own.
Can I use a baking stone inside a Dutch oven?
No, you should never place a baking stone inside a Dutch oven. It is redundant and potentially dangerous for your equipment. The cast iron pot already provides the necessary thermal mass to bake your bread. Adding a stone inside can prevent the lid from sealing properly. It also increases the risk of the stone cracking due to restricted heat circulation.
Do I need to preheat a baking stone for a full hour?
Yes, a full hour of preheating is non-negotiable for professional results. While your oven's air might reach the target temperature in fifteen minutes, the stone itself takes much longer to absorb that energy. A stone that isn't fully saturated with heat will pull warmth away from your dough. This leads to a pale, soft bottom crust and poor oven spring.
Why does my bread burn on the bottom in a Dutch oven?
Bottom burning is usually caused by intense radiant heat from your oven's lower heating element. The heavy cast iron absorbs this energy and transfers it too quickly to the base of your loaf. You can fix this easily. Place a spare baking sheet on the rack directly below your Dutch oven. This creates a heat shield that protects your bread from scorching.
What can I use if I do not have a Dutch oven or a baking stone?
You can use an inverted heavy-duty baking sheet as a temporary substitute. It won't hold as much heat as cordierite or cast iron, but it provides a flat surface for your dough. You will need to be aggressive with external steam. Place a pan of boiling water on the floor of the oven to help the crust stay supple during the rise.
How do I add steam to my oven when using a baking stone?
The most effective method is using a preheated cast iron skillet filled with lava rocks. Place the skillet on the bottom rack while you preheat the oven. When you load your dough, pour one cup of boiling water over the rocks. This creates an immediate, violent burst of steam. It replicates the humid environment of a professional deck oven perfectly.
Can I bake multiple loaves in a Dutch oven at once?
No, Dutch ovens are strictly designed for single-loaf production. Trying to crowd two loaves into one pot will result in misshapen bread and a gummy interior. If you need to bake for a crowd, a baking stone is one of the most essential tools for sourdough baking to consider. It allows you to maximize every inch of your oven's capacity.
How long should I let bread cool before putting it in a bread bag?
Wait at least two to four hours until the loaf is completely cool to the touch. Cutting or bagging bread while it's still warm traps steam inside the crumb. This ruins the texture and turns your crispy crust rubbery. Respect the cooling process. Once the bread has reached room temperature, it's ready for long-term storage in a breathable beeswax bag.


